Lexus NX: Components
Lexus NX Service Manual / Vehicle Interior / Theft Deterrent / Keyless Entry / Intrusion Sensor / Components
COMPONENTS
ILLUSTRATION
.png)
| *1 | DECK FLOOR BOX LH | *2 | NO. 3 DECK BOARD SUB-ASSEMBLY |
| *3 | REAR DECK FLOOR BOX | *4 | NEGATIVE AUXILIARY BATTERY TERMINAL |
.png) | N*m (kgf*cm, ft.*lbf): Specified torque | - | - |
ILLUSTRATION
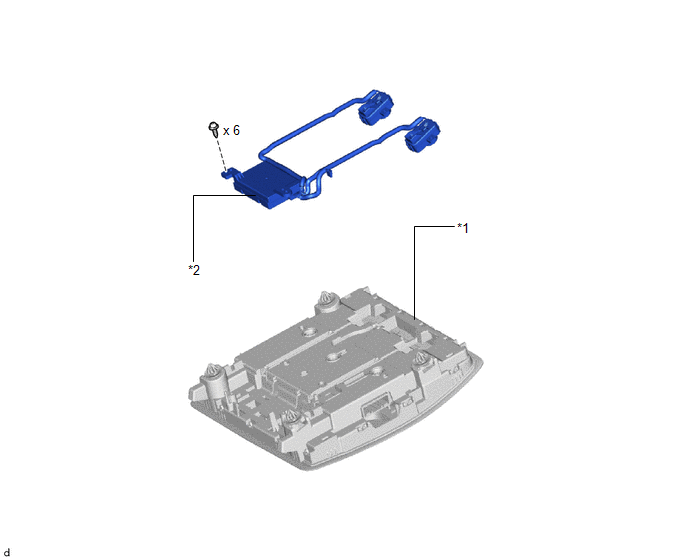
| *1 | MAP LIGHT ASSEMBLY | *2 | THEFT WARNING ULTRASONIC SENSOR |
READ NEXT:
 Removal
REMOVAL PROCEDURE 1. REMOVE DECK BOARD ASSEMBLY Click here 2. REMOVE NO. 3 DECK BOARD SUB-ASSEMBLY Click here 3. REMOVE REAR DECK FLOOR BOX (w/ Spare Tire) Click here 4. REMOVE DECK FLOOR BOX LH
Installation
INSTALLATION PROCEDURE 1. INSTALL THEFT WARNING ULTRASONIC SENSOR (a) Attach the 4 clamps to install the theft warning ultrasonic sensor. (b) Install the 6 screws and connect the connector. 2. INSTALL
Security Horn Assembly
ComponentsCOMPONENTS ILLUSTRATION *1 SECURITY HORN ASSEMBLY - - N*m (kgf*cm, ft.*lbf): Specified torque - - RemovalREMOVAL PROCEDURE 1. REMOVE SECURITY HORN ASSEMBLY (a) R
SEE MORE:
Installation
INSTALLATION PROCEDURE 1. INSTALL WINDSHIELD WASHER JAR ASSEMBLY (w/ Headlight Cleaner System) (a) Install the level warning switch assembly as shown in the illustration. NOTICE: Make sure that the protrusion of the level warning switch assembly is between the 2 markings. *a Protru
Installation
INSTALLATION PROCEDURE 1. INSTALL ENGINE WATER PUMP ASSEMBLY (a) Install a new gasket and the engine water pump assembly with the 5 bolts in the order shown in the illustration. Torque: 10 N·m {102 kgf·cm, 7 ft·lbf} 2. INSTALL V-RIBBED BELT TENSIONER ASSEMBLY (a) Using a 12 mm
© 2016-2024 Copyright www.lexunx.com
