Lexus NX: Disassembly
Lexus NX Service Manual / Vehicle Exterior / Exterior Panels / Trim / Back Door Outside Garnish / Disassembly
DISASSEMBLY
PROCEDURE
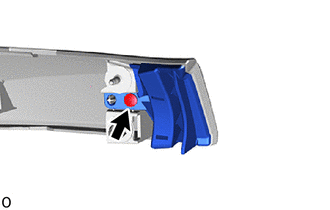
1. REMOVE BACK DOOR UPPER OUTSIDE GARNISH LH
| (a) Remove the screw and back door upper outside garnish LH. |
|
2. REMOVE BACK DOOR UPPER OUTSIDE GARNISH RH
HINT:
Use the same procedure described for the LH side.
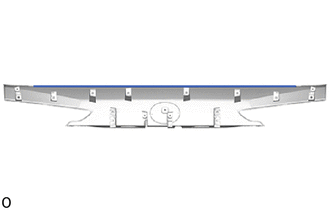
3. REMOVE BACK DOOR NO. 1 GARNISH RETAINER
| (a) Remove the 2 back door No. 1 garnish retainers. |
|
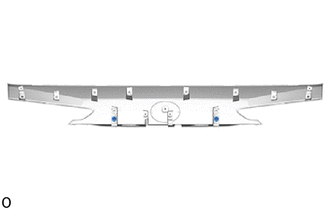
4. REMOVE BACK DOOR OUTSIDE GARNISH PROTECTOR
| (a) Remove the back door outside garnish protector. |
|
5. REMOVE SYMBOL EMBLEM
Click here .gif)
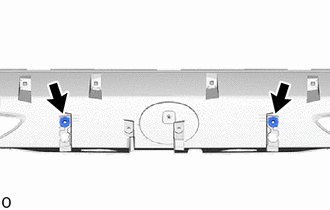
6. REMOVE NUT
| (a) Remove the 2 nuts. |
|
READ NEXT:
 Reassembly
REASSEMBLY PROCEDURE 1. INSTALL NUT (a) Install the 2 nuts. 2. INSTALL SYMBOL EMBLEM Click here 3. INSTALL BACK DOOR OUTSIDE GARNISH PROTECTOR (a) Clean the back door outside garnish surface. (1)
Installation
INSTALLATION PROCEDURE 1. INSTALL BACK DOOR OUTSIDE GARNISH SUB-ASSEMBLY (a) Attach the 12 clips to install the back door outside garnish sub-assembly. (b) Install the 4 bolts. Torque: 5.0 N·m {
SEE MORE:
Installation
INSTALLATION PROCEDURE 1. INSTALL CABLE SUPPORT BRACKET (a) Install the cable support bracket to the rear suspension member sub-assembly with the 2 bolts. Torque: 6.0 N·m {61 kgf·cm, 53 in·lbf} 2. INSTALL REAR STABILIZER SUPPORT BRACKET LH (a) Install the rear stabilizer support bracket LH to th
Removal
REMOVAL CAUTION / NOTICE / HINT HINT:
Use the same procedure for the RH and LH sides.
The procedure listed below is for the LH side.
PROCEDURE 1. REMOVE REAR WHEEL Click here 2. DISCONNECT REAR SPEED SENSOR LH (a) w/o AVS: Click here (b) w/ AVS: Click here 3. REMOVE REAR SUSPENSION ARM
© 2016-2024 Copyright www.lexunx.com
