Lexus NX: Input Shaft Oil Seal
Components
COMPONENTS
ILLUSTRATION
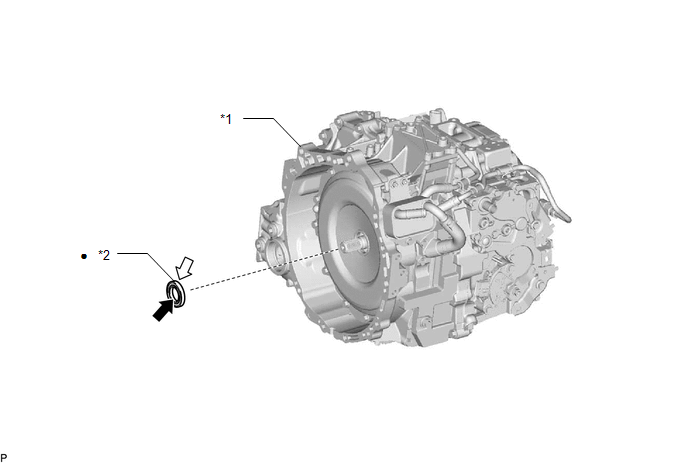
| *1 | HYBRID VEHICLE TRANSAXLE ASSEMBLY | *2 | INPUT SHAFT TYPE T OIL SEAL |
| ● | Non-reusable part | .png) | MP grease |
.png) | ATF WS | - | - |
Replacement
REPLACEMENT
PROCEDURE
1. REMOVE HYBRID VEHICLE TRANSAXLE ASSEMBLY
Click here .gif)
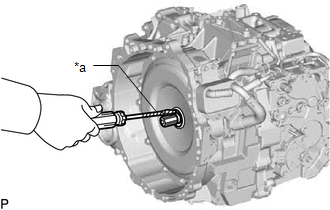
2. REMOVE INPUT SHAFT TYPE T OIL SEAL
| (a) Using a screwdriver with its tip wrapped with protective tape, remove the input shaft type T oil seal from the hybrid vehicle transaxle assembly. NOTICE: When removing the input shaft type T oil seal, make sure not to damage the input shaft assembly or hybrid vehicle transaxle housing. |
|
3. INSTALL INPUT SHAFT TYPE T OIL SEAL
| (a) Coat the lip of a new input shaft type T oil seal with MP grease. |
|
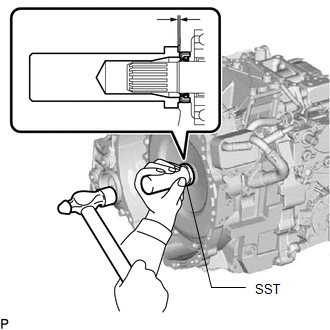
(b) Coat the outside edge of the input shaft type T oil seal with ATF.
(c) Using SST and a hammer, install the input shaft type T oil seal to the hybrid vehicle transaxle assembly.
SST: 09388-40010
Oil Seal Installation Depth:
1.0 to 1.8 mm (0.0394 to 0.0708 in.)
NOTICE:
- Ensure that no foreign matter adheres to the oil seal lip.
- Ensure that the oil seal is not at an angle.
4. INSTALL HYBRID VEHICLE TRANSAXLE ASSEMBLY
Click here
READ NEXT:
 Components
COMPONENTS ILLUSTRATION *1 NO. 1 ENGINE UNDER COVER ASSEMBLY - - ILLUSTRATION *1 FRONT ENGINE MOUNTING BRACKET *2 HYBRID VEHICLE TRANSAXLE ASSEMBLY *3 NO. 1 MOTOR WATER JA
Removal
REMOVAL PROCEDURE 1. REMOVE NO. 1 ENGINE UNDER COVER ASSEMBLY Click here 2. DRAIN COOLANT (for Inverter Coolant) Click here 3. REMOVE NO. 2 MOTOR WATER JACKET COVER ASSEMBLY (a) Remove the 5
SEE MORE:
Dtc Check / Clear
DTC CHECK / CLEAR CHECK FOR DTC NOTICE: When using the Techstream with the power switch off, connect the Techstream to the DLC3 and turn a courtesy light switch on and off at intervals of 1.5 seconds or less until communication between the Techstream and the vehicle begins. Then select the vehicle t
Installation
INSTALLATION CAUTION / NOTICE / HINT HINT:
Use the same procedure for the RH and LH sides.
The procedure listed below is for the LH side.
A bolt without a torque specification is shown in the standard bolt chart.
Click here PROCEDURE 1. INSTALL OUTER BELT ANCHOR BRACKET SUB-ASSEMBLY LH (
