Lexus NX: Inspection
INSPECTION
PROCEDURE
1. INSPECT MAP LIGHT ASSEMBLY (RAIN SENSOR CIRCUIT)
(a) Remove the map light assembly.
Click here .gif)
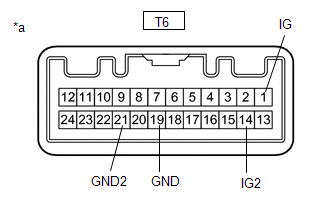
| (b) Measure the resistance according to the value(s) in the table below. Standard Resistance:
If the result is not as specified, replace the map light assembly. |
|
(c) Install the map light assembly.
Click here
READ NEXT:
 Installation
INSTALLATION PROCEDURE 1. INSTALL RAIN SENSOR TAPE NOTICE: The rain sensor tape is reusable. Only replace the tape if it is damaged or contaminated. (a) Clean the rain sensor sensing portion with a pi
Components
COMPONENTS ILLUSTRATION *A w/ Woofer *B w/o Woofer *C w/o Power Back Door *D w/ Power Back Door *1 BACK DOOR CENTER GARNISH *2 BACK DOOR FINISH COVER LH *3 BACK DOO
SEE MORE:
Diagnosis System
DIAGNOSIS SYSTEM CHECK DLC3 (a) Check the DLC3. Click here INSPECT AUXILIARY BATTERY VOLTAGE (a) Measure the auxiliary battery voltage with the power switch off. Standard voltage: 11 to 14 V If the voltage is below 11 V, recharge or replace the auxiliary battery.
Removal
REMOVAL PROCEDURE 1. TABLE OF BOLT, SCREW AND CLIP HINT: All bolts, screws, and clips relevant to installing and removing the instrument panel are shown along with their alphabet code in the table below. 2. DISABLE AUTOAWAY/RETURN FUNCTION (for Power Tilt and Power Telescopic Steering Column) (a) D
© 2016-2024 Copyright www.lexunx.com
