Lexus NX: Inspection
INSPECTION
PROCEDURE
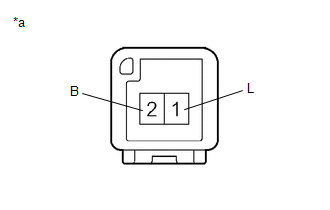
1. INSPECT GLOVE BOX LIGHT ASSEMBLY
| (a) Apply battery voltage to the connector and check the light illumination condition. OK:
If the result is not as specified, replace the glove box light assembly. |
|
READ NEXT:
 Installation
INSTALLATION PROCEDURE 1. INSTALL GLOVE BOX LIGHT ASSEMBLY (a) Attach the 2 claws to install the glove box light assembly. 2. INSTALL LOWER INSTRUMENT PANEL SUB-ASSEMBLY Click here 3.
Parts Location
PARTS LOCATION ILLUSTRATION *1 MAP LIGHT ASSEMBLY *2 SPOT LIGHT ASSEMBLY *3 VISOR ASSEMBLY RH *4 VISOR ASSEMBLY LH *5 VANITY LIGHT ASSEMBLY RH *6 VANITY LIGHT ASSEMBLY LH
SEE MORE:
Disassembly
DISASSEMBLY PROCEDURE 1. REMOVE HEADLIGHT WASHER ACTUATOR SUB-ASSEMBLY RH (w/ Headlight Cleaner System) Click here 2. REMOVE HEADLIGHT WASHER ACTUATOR SUB-ASSEMBLY LH (w/ Headlight Cleaner System) HINT: Use the same procedure described for the RH side. 3. REMOVE HEADLIGHT CLEANER WASHER NOZZLE COV
Terminals Of Ecu
TERMINALS OF ECU CHECK AIR CONDITIONING AMPLIFIER ASSEMBLY (a) Disconnect the I50 air conditioning amplifier assembly connector. (b) Measure the voltage and resistance according to the value(s) in the table below. Tester Connection Wiring Color Terminal Description Condition Specified Co
© 2016-2024 Copyright www.lexunx.com
