Lexus NX: Inspection
Lexus NX Service Manual / Vehicle Interior / Seat Belt / Seat Belt Warning Light (for Rear Side) / Inspection
INSPECTION
PROCEDURE
1. INSPECT AIR CONDITIONING CONTROL ASSEMBLY (SEAT BELT WARNING LIGHT) (for Rear Side)
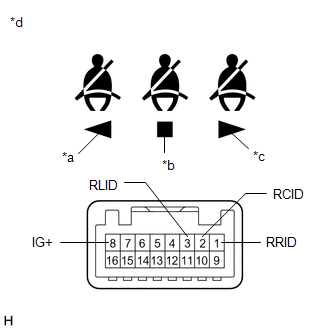
| (a) Check the seat belt warning light illumination. OK:
If the result is not as specified, replace the air conditioning control assembly (seat belt warning light). |
|
READ NEXT:
 Installation
INSTALLATION PROCEDURE 1. INSTALL AIR CONDITIONING CONTROL ASSEMBLY (SEAT BELT WARNING LIGHT) (a) Connect the 2 connectors. (b) Attach the 6 clips to install the air conditioning control assembly (
Parts Location
PARTS LOCATION ILLUSTRATION *1 AIRBAG ECU ASSEMBLY *2 PARKING BRAKE ECU ASSEMBLY *3 AIR CONDITIONING CONTROL ASSEMBLY *4 HYBRID VEHICLE CONTROL ECU *5 BRAKE BOOSTER WITH MAST
SEE MORE:
Components
COMPONENTS ILLUSTRATION *A w/o Power Back Door System *B w/ Power Back Door System *1 BACK DOOR FINISH COVER LH *2 BACK DOOR FINISH COVER RH *3 BACK DOOR LOCK COVER *4 BACK DOOR OUTSIDE GARNISH SUB-ASSEMBLY *5 BACK DOOR SIDE GARNISH LH *6 BACK DOOR SIDE GARNIS
Dtc Check / Clear
DTC CHECK / CLEAR CHECK DTC (a) Connect the Techstream to the DLC3. (b) Turn the power switch on (IG). (c) Turn the intelligent clearance sonar system on. (d) Turn the Techstream on. (e) Enter the following menus: Body Electrical / Advanced Parking Guidance/ICS/Intuitive P/A / Trouble Codes. (f) Che
© 2016-2024 Copyright www.lexunx.com
