Lexus NX: Inspection
INSPECTION
PROCEDURE
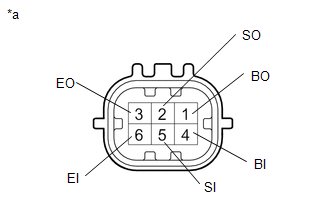
1. INSPECT FRONT CENTER ULTRASONIC SENSOR
| (a) Measure the resistance according to the value(s) in the table below. Standard Resistance:
If the result is not as specified, replace the front center ultrasonic sensor. |
|

2. INSPECT FRONT CORNER ULTRASONIC SENSOR
| (a) Measure the resistance according to the value(s) in the table below. Standard Resistance:
If the result is not as specified, replace the front corner ultrasonic sensor. |
|
READ NEXT:
 Installation
INSTALLATION PROCEDURE 1. INSTALL ULTRASONIC SENSOR CUSHION SET HINT: Perform the following procedure only when replacement of a ultrasonic sensor cushion set is necessary. (a) Install the ultrasonic
Components
COMPONENTS ILLUSTRATION *A w/ Hands Free Power Back Door - - *1 NO. 2 LUGGAGE ROOM WIRE *2 REAR CENTER ULTRASONIC SENSOR *3 REAR CENTER ULTRASONIC SENSOR RETAINER *4 REAR
SEE MORE:
Components
COMPONENTS ILLUSTRATION *A w/o AVS *B w/ AVS *1 REAR SPEED SENSOR LH *2 REAR SUSPENSION ARM COVER LH *3 REAR UPPER CONTROL ARM ASSEMBLY LH *4 PARKING BRAKE WIRE BRACKET N*m (kgf*cm, ft.*lbf): Specified torque * For use with ball joint lock nut wrench
Installation
INSTALLATION PROCEDURE 1. INSTALL AIR CONDITIONING THERMISTOR ASSEMBLY (HUMIDITY SENSOR) *1 Stopper *2 Bracket (a) Attach the 2 brackets, and carefully install the air conditioning thermistor assembly (humidity sensor) to the glass surface, preventing air bubbles from forming between
