Lexus NX: Installation
INSTALLATION
CAUTION / NOTICE / HINT
CAUTION:
Wear protective gloves. Sharp areas on the parts may injure your hands.
PROCEDURE
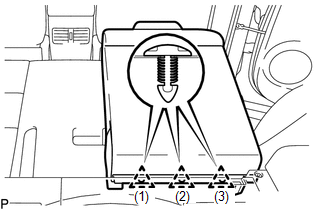
1. INSTALL NO. 1 SEAT LEG ASSEMBLY
| (a) Attach the 2 guides to temporarily install the No. 1 seat leg assembly. |
|
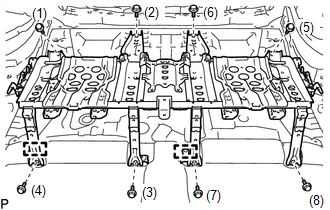
(b) Tighten the 8 bolts in the order indicated in the illustration to install the No. 1 seat leg assembly.
Torque:
42 N·m {428 kgf·cm, 31 ft·lbf}
| (c) w/o Seat Heater System: (1) Attach the 2 claws and 3 clamps to connect the wire harness. |
|
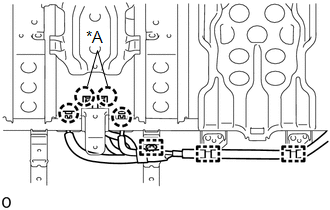
(d) w/ Seat Heater System:
(1) Attach the 4 claws and 3 clamps to connect the wire harness.
2. INSTALL NO. 2 TOOL BOX SUB-ASSEMBLY
Click here .gif)
3. INSTALL NO. 1 TOOL BOX SUB-ASSEMBLY
Click here
4. INSTALL DECK FLOOR BOX LH
Click here
5. INSTALL DECK FLOOR BOX RH
Click here
6. INSTALL SPARE TIRE
Click here
7. INSTALL REAR DECK FLOOR BOX
Click here
8. INSTALL NO. 3 DECK BOARD SUB-ASSEMBLY
Click here
9. INSTALL NO. 2 DECK BOARD SUB-ASSEMBLY
Click here
10. INSTALL BATTERY SERVICE COVER BOARD
| (a) Attach the 2 guides to install the battery service cover board. |
|
.png)
(b) Install the 5 clips.
11. INSTALL BATTERY SERVICE HOLE COVER
| (a) Attach the 2 guides and 2 claws to install the battery service hole cover. |
|
.png)
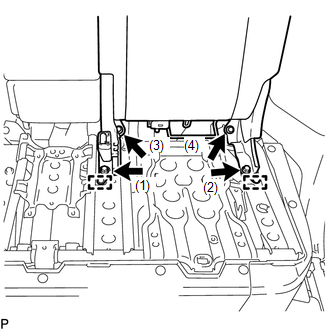
12. INSTALL REAR SEATBACK ASSEMBLY RH
| (a) Attach the 2 guides and temporarily install the rear seatback assembly RH with the 4 bolts. |
|
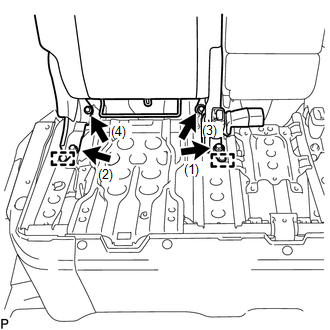
(b) Tighten the 4 bolts in the order indicated in the illustration.
Torque:
42 N·m {428 kgf·cm, 31 ft·lbf}
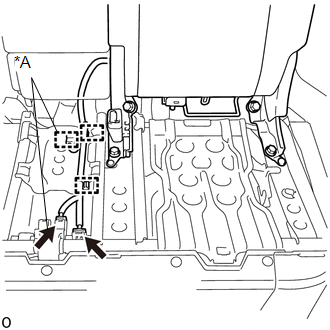
| (c) w/o Seat Heater System: (1) Attach the 2 clamps and connect the connector. |
|
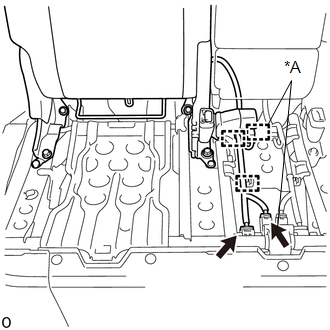
(d) w/ Seat Heater System:
(1) Attach the 3 clamps and connect the 2 connectors.
(e) Operate the rear power seat switch to fold down the rear seatback assembly RH.
| (f) Install the 3 clips in the order indicated in the illustration. |
|
(g) Operate the rear power seat switch to move the rear seatback assembly RH to the upright position.
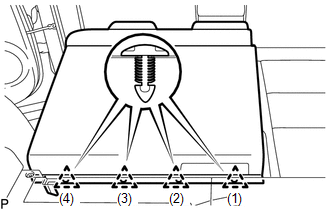
13. INSTALL REAR SEATBACK ASSEMBLY LH
| (a) Attach the 2 guides and temporarily install the rear seatback assembly LH with the 4 bolts. |
|
(b) Tighten the 4 bolts in the order indicated in the illustration.
Torque:
42 N·m {428 kgf·cm, 31 ft·lbf}
| (c) w/o Seat Heater System: (1) Attach the 2 clamps and connect the connector. |
|
(d) w/ Seat Heater System:
(1) Attach the 3 clamps and connect the 2 connectors.
(e) Operate the rear power seat switch to fold down the rear seatback assembly LH.
| (f) Install the 4 clips in the order indicated in the illustration. |
|
(g) Operate the rear power seat switch to move the rear seatback assembly LH to the upright position.
14. INSTALL REAR POWER SEAT SWITCH
Click here
15. INSTALL NO. 3 BATTERY SERVICE COVER BOARD
(a) Connect the connector.
(b) Attach the clamp to connect the connector.
(c) Attach the guide and 2 clips to install the No. 3 battery service cover board.
(d) Install the 2 clips.
16. INSTALL NO. 2 BATTERY SERVICE COVER BOARD
HINT:
Use the same procedure described for the No. 3 battery service cover board.
17. INSTALL REAR DOOR SCUFF PLATE LH
Click here
18. INSTALL REAR DOOR SCUFF PLATE RH
HINT:
Use the same procedure described for the LH side.
19. INSTALL BENCH TYPE REAR SEAT CUSHION ASSEMBLY
(a) Pass the rear seat inner with center belt assembly RH through the rubber band of the rear seat cushion assembly.
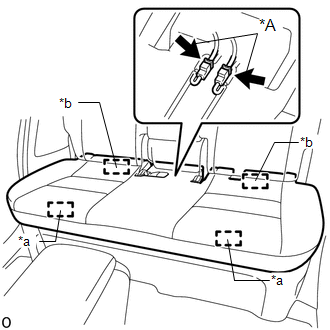
| (b) w/ Seat Heater System: (1) Connect the 2 connectors. |
|
(c) Attach the 2 hooks on the rear of the rear seat cushion frame.
(d) Attach the 2 rear seat cushion lock hooks to install the rear seat cushion assembly.
NOTICE:
Check that the rear seat cushion lock hook and the rear seat cushion frame are securely inserted.
20. INSTALL DECK BOARD ASSEMBLY
Click here
21. INSTALL TONNEAU COVER ASSEMBLY
Click here
22. INITIALIZATION FOLD SEAT CONTROL ECU
NOTICE:
After performing the following procedures, initialize the fold seat control ECU.
Click here
- When replacing the fold seat control ECU with a new one.
-
When canceling fold seat control ECU initialization (initial position reset).
After performing the following procedures, initialize the fold seat control ECU (initial position reset and initial position memorization).
-
When replacing the fold seat control ECU with another one.
Click here
- When the seatback was moved with the fold seat control ECU removed.
- When the seatback position became incorrect due to disassembly or replacement of the seat, etc.
23. INSPECT REAR POWER SEAT CONTROL SYSTEM
Click here
24. INSPECT SEAT BELT WARNING SYSTEM
Click here
25. INSPECT SEAT HEATER SYSTEM (for Rear Seat) (w/ Seat Heater System)
Click here
READ NEXT:
 Components
COMPONENTS ILLUSTRATION *1 BENCH TYPE REAR SEAT CUSHION ASSEMBLY - - ILLUSTRATION *1 BENCH TYPE REAR SEAT CUSHION COVER (REAR SEAT CUSHION HEATER ASSEMBLY) *2 BENCH TYPE REAR SE
Removal
REMOVAL CAUTION / NOTICE / HINT CAUTION: Wear protective gloves. Sharp areas on the parts may injure your hands. PROCEDURE 1. REMOVE BENCH TYPE REAR SEAT CUSHION ASSEMBLY Click here 2. REMOVE BENCH
SEE MORE:
Check Bus 2 Line for Short to GND
DESCRIPTION There may be a short circuit between one of the CAN bus wire and GND when there is no resistance between terminal 18 (CA4H) of the central gateway ECU (network gateway ECU) and terminal 4 (CG) of the DLC3, or terminal 17 (CA4L) of the central gateway ECU (network gateway ECU) and termina
Installation
INSTALLATION PROCEDURE 1. INSTALL NO. 2 COOLING FAN MOTOR (a) Attach the 2 clamps and install the No. 2 cooling fan motor with the 3 screws. Torque: 3.9 N·m {40 kgf·cm, 35 in·lbf} (b) Install the cooling fan motor insulator to the fan shroud with the 2 screws. Torque: 2.6 N·m {27 kgf·cm, 23 i
