Lexus NX: On-vehicle Inspection
Lexus NX Service Manual / Vehicle Exterior / Wiper / Washer / Rear Wiper Motor / On-vehicle Inspection
ON-VEHICLE INSPECTION
PROCEDURE
1. INSPECT REAR WIPER MOTOR ASSEMBLY
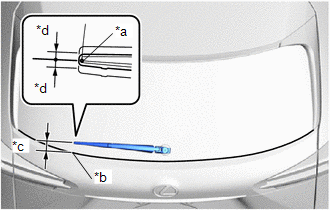
| (a) Check the automatic stop (park) position. (1) Operate the rear wiper motor assembly, and then stop the operation. Check the wiper arm automatic stop (park) position. OK: Rear wiper arm stops at the position shown in the illustration. HINT: After the wiper arm stops, lift it up 2 times and check the automatic stop (park) position. |
|
READ NEXT:
 Removal
REMOVAL PROCEDURE 1. REMOVE BACK DOOR CENTER GARNISH Click here 2. REMOVE BACK DOOR SIDE GARNISH LH Click here 3. REMOVE BACK DOOR SIDE GARNISH RH Click here 4. REMOVE BACK DOOR TRIM BASE (w/
Inspection
INSPECTION PROCEDURE 1. INSPECT REAR WIPER MOTOR ASSEMBLY *a Component without harness connected (Rear Wiper Motor Assembly) (a) Check that the rear wiper motor assembly operates. NOTICE: Che
Installation
INSTALLATION PROCEDURE 1. INSTALL REAR WIPER MOTOR GROMMET (a) Apply MP grease to the entire circumference of the lip portion of the rear wiper motor grommet. HINT: Do not fill the hole with MP gre
SEE MORE:
Data List / Active Test
DATA LIST / ACTIVE TEST DATA LIST NOTICE:
In the table below, the values listed under "Normal Condition" are reference values. Do not depend solely on these reference values when deciding whether a part is faulty or not.
When using the Techstream with the power switch off, connect the Techstrea
Adjustment (one Time Recognition)
ADJUSTMENT (ONE TIME RECOGNITION) CAUTION / NOTICE / HINT NOTICE: Make sure to read Before Starting Adjustment before proceeding with work. Click here PROCEDURE 1. SECURE APPROPRIATE AREA FOR PERFORMING LEARNING (a) Park the vehicle on a level surface. HINT:
Make sure that the target recogni
© 2016-2024 Copyright www.lexunx.com
