Lexus NX: Operation Check
OPERATION CHECK
CHECK POWER SEAT FUNCTION
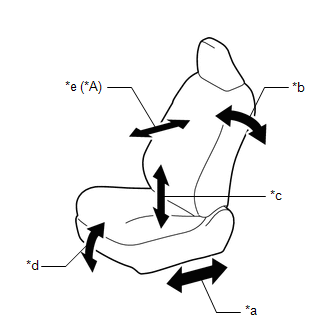
| *A | for Driver Side |
| *a | Slide Function |
| *b | Reclining Function |
| *c | Rear Lifter Function |
| *d | Front Vertical Function |
| *e | Lumbar Support Adjustment Function |
(a) Check the basic functions.
(1) Operate the power seat switches and check that the following seat functions operate properly:
- Slide function
- Reclining function
- Rear lifter function
- Front vertical function
- Lumbar support adjustment function
CHECK POWER SEAT MOTOR (SLIDE, FRONT VERTICAL, REAR LIFTER AND RECLINING FUNCTIONS)
(a) Check the PTC operation inside the power seat motor.
NOTICE:
- The inspection should be performed with the seat installed in the vehicle.
- Perform the 4 steps below to check the full range of motion for each power seat function.
HINT:
The resistance of the PTC thermistor increases when a switch of the front power seat switch is held down even after the seat has been moved to the farthest possible position in one direction. If the resistance increases beyond a specified level, the current is shut off to prevent a short circuit.
(1) Choose a power seat function. Operate a switch of the front power seat switch and move the seat to the farthest possible position in one direction. Keep the seat in that position for approximately 60 seconds.
(2) Operate the switch of the front power seat switch again and continue to try to move the seat in the same direction as in the previous step. Measure the time until the current is shut off (motor operation sound will stop).
Standard:
4 to 90 seconds
(3) After the current is shut off, release the switch of the front power seat switch and wait for approximately 60 seconds.
(4) Operate the same switch of the front power seat switch and move the seat in the opposite direction. Check that the motor operates.
CHECK LUMBAR SUPPORT ADJUSTMENT MOTOR (for Driver Side)
(a) Check the PTC operation inside the lumbar support adjustment motor.
NOTICE:
The inspection should be performed with the seat installed in the vehicle.
(1) Operate the front lumbar power seat switch and move the lumbar support to either the foremost or rearmost position. Keep the seat in that position for approximately 60 seconds.
(2) Operate the front lumbar power seat switch again and continue to try to move the lumbar support in the same direction as in the previous step. Measure the time until the current is shut off (motor operation sound will stop).
Standard:
4 to 90 seconds
(3) After the current is shut off, release the front lumbar power seat switch and wait for approximately 60 seconds.
(4) Operate the front lumbar power seat switch and move the lumbar support in the opposite direction. Check that the motor operates.
READ NEXT:
 Problem Symptoms Table
PROBLEM SYMPTOMS TABLE HINT: Use the table below to help determine the cause of problem symptoms. If multiple suspected areas are listed, the potential causes of the symptoms are listed in order of pr
Precaution
PRECAUTION HINT:
The following procedures are used to prevent wrinkles from forming when installing the seat cover. Make sure to follow the procedures correctly.
The shape of the seat shown i
SEE MORE:
Installation
INSTALLATION PROCEDURE 1. INSTALL NO. 5 ANTENNA CORD SUB-ASSEMBLY (a) Install the 2 grommets. (b) Attach the 3 clamps and install the washer hose to the clamp. (c) Connect the 4 connectors and install the No. 5 antenna cord sub-assembly. 2. INSTALL BACK DOOR TRIM BOARD ASSEMBLY Click here 3. INST
Installation
INSTALLATION PROCEDURE 1. INSTALL INTEGRATION CONTROL AND PANEL ASSEMBLY (ABSORBER CONTROL SWITCH) (a) Install the integration control and panel assembly (absorber control switch) to the upper rear console panel sub-assembly with the 2 screws. HINT: The locations labeled A in the illustration are
