Lexus NX: Reassembly
Lexus NX Service Manual / Vehicle Interior / Interior Panels / Trim / Lower Instrument Panel / Reassembly
REASSEMBLY
PROCEDURE
1. INSTALL GLOVE COMPARTMENT DOOR LOCK CYLINDER ASSEMBLY
(a) With the cylinder lock pressed, insert the glove compartment door lock cylinder assembly into the glove compartment door assembly to install it as shown in the illustration.
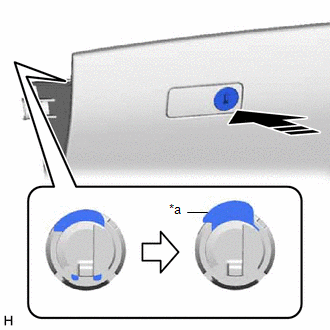
| *a | Cylinder Lock |
.png) | Install in this Direction |
2. INSTALL GLOVE BOX LIGHT ASSEMBLY
Click here .gif)
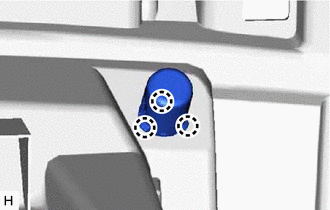
3. INSTALL GLOVE COMPARTMENT DOOR CHECK CUSHION
HINT:
Use the same procedure for both glove compartment door check cushions.
| (a) Attach the 3 claws to install the glove compartment door check cushions. |
|
READ NEXT:
 Installation
INSTALLATION CAUTION / NOTICE / HINT HINT: A bolt without a torque specification is shown in the standard bolt chart. Click here PROCEDURE 1. INSTALL LOWER INSTRUMENT PANEL SUB-ASSEMBLY (a) Cut off
Components
COMPONENTS ILLUSTRATION *1 DECK BOARD ASSEMBLY *2 DECK FLOOR BOX LH *3 NO. 3 DECK BOARD SUB-ASSEMBLY *4 REAR DECK FLOOR BOX *5 NEGATIVE AUXILIARY BATTERY TERMINAL - -
SEE MORE:
Installation
INSTALLATION CAUTION / NOTICE / HINT HINT:
Use the same procedure for RHD and LHD vehicles.
The procedure listed below is for LHD vehicles.
PROCEDURE 1. INSTALL COOLER THERMISTOR (ROOM TEMPERATURE SENSOR) (a) Connect the aspirator hose. (b) Connect the connector. (c) Attach the 2 claws to in
Removal
REMOVAL CAUTION / NOTICE / HINT HINT:
Use the same procedure for the RH and LH sides.
The procedure listed below is for the LH side.
PROCEDURE 1. REMOVE SIDE MUDGUARD SUB-ASSEMBLY LH HINT: When removing the side mudguard sub-assembly LH, if the No. 3 moulding tape (double-sided tape) is diff
© 2016-2024 Copyright www.lexunx.com
