Lexus NX: Removal
REMOVAL
PROCEDURE
1. REMOVE NO. 1 ENGINE COVER SUB-ASSEMBLY
Click here .gif)
2. REMOVE CAMSHAFT TIMING OIL CONTROL VALVE ASSEMBLY
| (a) Disconnect the camshaft timing oil control valve assembly connector. |
|
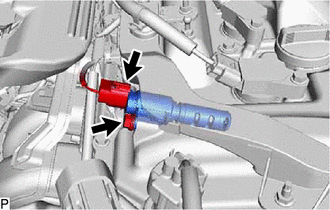
(b) Remove the bolt and camshaft timing oil control valve assembly from the cylinder head cover sub-assembly.
NOTICE:
Replace with a new part if it is dropped or if it receives a strong impact.
| (c) Remove the O-ring from the camshaft timing oil control valve assembly. HINT: An O-ring is already installed in a new camshaft timing oil control valve assembly. So, the O-ring does not need to be removed when the assembly is replaced with a new one. |
|

READ NEXT:
 Inspection
INSPECTION PROCEDURE 1. INSPECT CAMSHAFT TIMING OIL CONTROL VALVE ASSEMBLY (a) Measure the resistance according to the value(s) in the table below. Standard Resistance: Tester Connection Conditi
Installation
INSTALLATION PROCEDURE 1. INSTALL CAMSHAFT TIMING OIL CONTROL VALVE ASSEMBLY (a) Apply a light coat of engine oil to a new O-ring and install the O-ring to the camshaft timing oil control valve assemb
Camshaft Position Sensor
ComponentsCOMPONENTS ILLUSTRATION *1 CAMSHAFT POSITION SENSOR *2 NO. 1 ENGINE COVER SUB-ASSEMBLY N*m (kgf*cm, ft.*lbf) : Specified torque Toyota Genuine Adhesive 1324, Three Bon
SEE MORE:
Removal
REMOVAL PROCEDURE 1. RECOVER REFRIGERANT FROM REFRIGERATION SYSTEM Click here 2. REMOVE RADIATOR ASSEMBLY Click here 3. REMOVE FRONT BUMPER COVER (a) for Sport Package: Click here (b) except Sport Package: Click here 4. DISCONNECT DISCHARGE HOSE SUB-ASSEMBLY (a) Remove the bolt and discon
Installation
INSTALLATION PROCEDURE 1. INSTALL MAP LIGHT ASSEMBLY (PERSONAL LIGHT) (a) Connect the connectors. (b) Attach the 4 clips to install the map light assembly (personal light).
© 2016-2024 Copyright www.lexunx.com
