Lexus NX: Removal
REMOVAL
CAUTION / NOTICE / HINT
CAUTION:
- Wear protective gloves when removing the exhaust pipe assembly.
- The exhaust pipe assembly is extremely hot immediately after the engine has stopped.
- Confirm that the exhaust pipe assembly has cooled down before removing it.
PROCEDURE
1. REMOVE TAIL EXHAUST PIPE ASSEMBLY
(a) Remove the 2 bolts and 2 compression springs.
(b) Disconnect the 2 exhaust pipe supports and remove the tail exhaust pipe assembly.
(c) Remove the gasket from the center exhaust pipe assembly.
2. REMOVE CENTER EXHAUST PIPE ASSEMBLY
(a) Remove the 2 bolts.
(b) Disconnect the 3 exhaust pipe supports and remove the center exhaust pipe assembly.
(c) Remove the gasket from the front exhaust pipe assembly.
3. REMOVE FRONT EXHAUST PIPE ASSEMBLY
(a) Remove the 2 bolts, 2 compression springs and front exhaust pipe assembly.
(b) Remove the gasket from the exhaust manifold converter sub-assembly.
4. REMOVE HEATED OXYGEN SENSOR
Click here .gif)
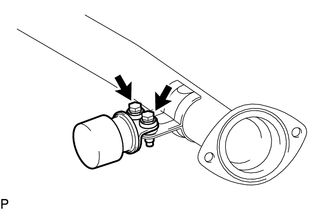
5. REMOVE EXHAUST PIPE DAMPER
| (a) Remove the 2 bolts and exhaust pipe damper. |
|
READ NEXT:
 Installation
INSTALLATION PROCEDURE 1. INSTALL EXHAUST PIPE DAMPER (a) Install the exhaust pipe damper with the 2 bolts. Torque: 19 N·m {194 kgf·cm, 14 ft·lbf} 2. INSTALL HEATED OXYGEN SENSOR Click here 3. I
Components
COMPONENTS ILLUSTRATION *A w/o Performance Damper *B w/ Performance Damper *1 AIR CLEANER CASE SUB-ASSEMBLY *2 AIR CLEANER FILTER ELEMENT SUB-ASSEMBLY *3 OUTER COWL TOP PANEL
SEE MORE:
Heated Oxygen Sensor
ComponentsCOMPONENTS ILLUSTRATION *1 FRONT EXHAUST PIPE SUB-ASSEMBLY *2 HEATED OXYGEN SENSOR *3 COMPRESSION SPRING *4 GASKET N*m (kgf*cm, ft.*lbf): Specified torque * For use with SST ● Non-reusable part - - RemovalREMOVAL PROCEDURE 1. REMOVE FRONT EXH
Automatic air conditioning system
Air outlets and fan speed are automatically adjusted according to the
temperature
setting.
Press the "MENU" button on the Remote Touch, then select
to display the
air conditioning control screen.
The air conditioning system can be displayed and operated on the side display.
Air conditi
