Lexus NX: Removal
REMOVAL
PROCEDURE
1. PRECAUTION
NOTICE:
After turning the power switch off, waiting time may be required before disconnecting the cable from the negative (-) auxiliary battery terminal.
Click here 
2. REMOVE DECK BOARD ASSEMBLY
Click here
3. REMOVE NO. 3 DECK BOARD SUB-ASSEMBLY
Click here
4. REMOVE DECK FLOOR BOX LH
Click here
5. DISCONNECT CABLE FROM NEGATIVE AUXILIARY BATTERY TERMINAL
6. REMOVE AUXILIARY BATTERY
| (a) Detach the claw to open the auxiliary battery terminal cap. |
|
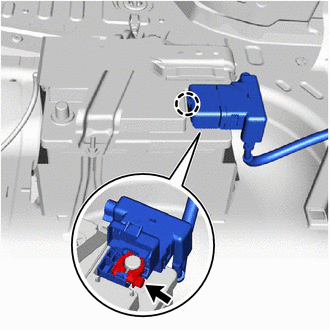
(b) Loosen the nut and disconnect the cable from the positive (+) auxiliary battery terminal.
| (c) Detach the clamp and disconnect the wire harness. |
|
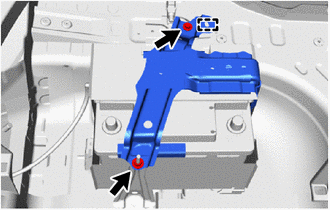
(d) Remove the bolt, nut and battery clamp sub-assembly from the auxiliary battery.
| (e) Disconnect the auxiliary battery hose. |
|
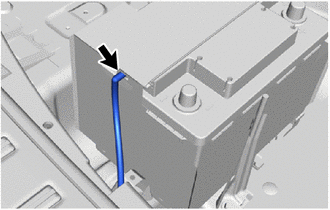
(f) Remove the battery insulator from the auxiliary battery.
(g) Remove the auxiliary battery.
READ NEXT:
 Installation
INSTALLATION PROCEDURE 1. INSTALL AUXILIARY BATTERY (a) Install the auxiliary battery. (b) Install the battery insulator to the auxiliary battery. (c) Install the L-shaped pipe section
Battery Thermometer Sensor
On-vehicle InspectionON-VEHICLE INSPECTION PROCEDURE 1. INSPECT THERMISTOR ASSEMBLY (a) Disconnect the thermistor assembly connector. *a Component without harness connected (Thermis
SEE MORE:
Precaution
PRECAUTION NOTICE: When disassembling the fog light assembly, use static electricity countermeasures SST (desktop anti-static mat set) and observe all precautions to prevent damage to the system by electrostatic discharge (ESD). STATIC ELECTRICITY COUNTERMEASURES SST SST:Desktop anti-static mat set
Diagnosis System
DIAGNOSIS SYSTEM DESCRIPTION (a) Seat heater system data and Diagnostic Trouble Codes (DTCs) can be read through the Data Link Connector 3 (DLC3) of the vehicle. When the system seems to be malfunctioning, use the Techstream to check for malfunctions and perform repairs. CHECK DLC3 (a) Check the DLC
