Lexus NX: Removal
REMOVAL
PROCEDURE
1. PRECAUTION
CAUTION:
Be sure to read precaution thoroughly before servicing.
Click here .gif)
2. REMOVE REAR WHEEL (for LH Side)
Click here
3. REMOVE QUARTER OUTSIDE MOULDING SUB-ASSEMBLY LH
Click here
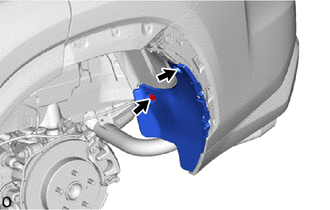
4. REMOVE REAR BUMPER SIDE SEAL LH
| (a) Remove the 2 clips and rear bumper side seal LH. |
|
5. REMOVE REAR WHEEL HOUSE FRONT PLATE LH
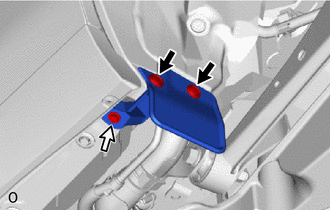
.png) | Clip |
.png) | Screw |
(a) Remove the 2 clips, screw and rear wheel house front plate LH.
6. REMOVE REAR WHEEL HOUSE LINER LH
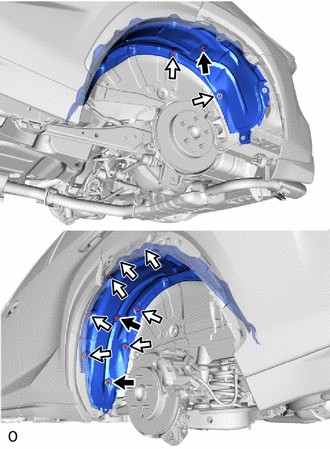
| | Clip (A) |
| | Clip (B) |
(a) Remove the 3 clips (A), 9 clips (B) and rear wheel house liner LH.
7. REMOVE REAR TIRE PRESSURE MONITOR INITIATOR
| (a) Remove the service hole cover, and then disconnect the connector of the rear tire pressure monitor initiator. |
|
| (b) Disconnect the grommet. |
|
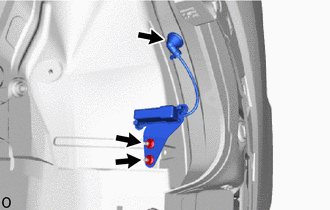
(c) Remove the 2 nuts and rear tire pressure monitor initiator.
READ NEXT:
 Installation
INSTALLATION PROCEDURE 1. PRECAUTION CAUTION: Be sure to read precaution thoroughly before servicing. Click here 2. INSTALL REAR TIRE PRESSURE MONITOR INITIATOR (a) Install the rear tire pressure mo
Components
COMPONENTS ILLUSTRATION *1 DECK FLOOR BOX LH *2 NO. 3 DECK BOARD SUB-ASSEMBLY *3 REAR DECK FLOOR BOX *4 NEGATIVE AUXILIARY BATTERY TERMINAL N*m (kgf*cm, ft.*lbf): Specified
SEE MORE:
All Door Entry Lock/Unlock Functions and Wireless Functions do not Operate
DESCRIPTION If the entry lock and wireless lock operations cannot be performed, there may be door control receiver malfunctions, wave interference or problems in the communication which is used for the entry and wireless function between the door control receiver and certification ECU (smart key ECU
Repair
REPAIR CAUTION / NOTICE / HINT HINT:
Use the same procedure for the RH and LH sides.
The procedure listed below is for the LH side.
If the installation area of the headlight assembly is damaged, use the supply retainer for low-cost repair.
Make sure that the headlight assembly is not damage
