Lexus NX: Removal
REMOVAL
PROCEDURE
1. REMOVE BACK DOOR CENTER GARNISH
Click here .gif)
2. REMOVE BACK DOOR SIDE GARNISH LH
Click here
3. REMOVE BACK DOOR SIDE GARNISH RH
Click here
4. REMOVE BACK DOOR TRIM BASE
Click here
5. REMOVE PULL HANDLE
Click here
6. REMOVE BACK DOOR LOCK COVER
Click here
7. REMOVE BACK DOOR TRIM BOARD ASSEMBLY
Click here
8. REMOVE MULTIPLEX NETWORK DOOR ECU
(a) Remove the 2 bolts.
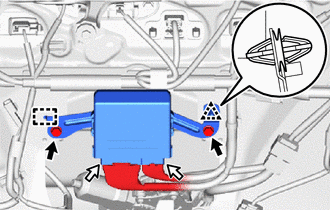
.png) | Bolt |
.png) | Connector |
(b) Detach the clip and guide, and remove the multiplex network door ECU.
NOTICE:
Be careful when removing the multiplex network door ECU may fall and become damaged.
(c) Disconnect the 2 connectors.
READ NEXT:
 Installation
INSTALLATION PROCEDURE 1. INSTALL MULTIPLEX NETWORK DOOR ECU (a) Connect the 2 connectors. Bolt Connector (b) Attach the guide and clip to install the multiplex network door ECU. NOTI
Parts Location
PARTS LOCATION ILLUSTRATION *1 BACK DOOR OPENER SWITCH ASSEMBLY *2 MULTIPLEX NETWORK DOOR ECU *3 BACK DOOR LOCK ASSEMBLY *4 BACK DOOR LOCK MOTOR *5 LATCH SWITCH *6 PAWL S
SEE MORE:
Diagnosis System
DIAGNOSIS SYSTEM SYMPTOM SIMULATION HINT: The most difficult case in troubleshooting is when no problem symptoms occur. In such a case, a thorough problem analysis must be carried out. A simulation of the same or similar conditions and environment in which the problem occurred in the customer's vehi
Data List / Active Test
DATA LIST / ACTIVE TEST DATA LIST HINT: Using the Techstream to read the Data List allows the values or states of switches, sensors, actuators and other items to be read without removing any parts. This non-intrusive inspection can be very useful because intermittent conditions or signals may be dis
© 2016-2024 Copyright www.lexunx.com
