Lexus NX: Removal
REMOVAL
PROCEDURE
1. REMOVE BACK DOOR CENTER GARNISH
Click here .gif)
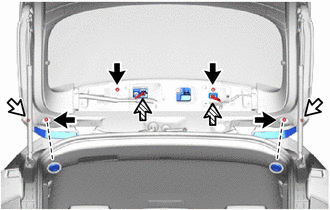
2. REMOVE REAR SPOILER ASSEMBLY
(a) Remove the 2 hole plugs.
.png) | Nut |
.png) | Bolt |
.png) | Connector |
(b) Remove the 4 nuts.
(c) Remove the 2 bolts.
(d) Disconnect the 2 connectors.
| (e) Put protective tape around the rear spoiler assembly. |
|
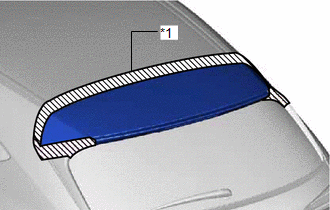
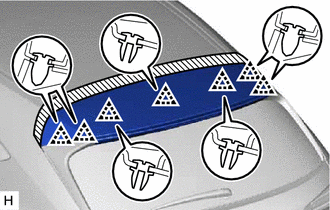
| (f) Using moulding remover D, detach the 7 clips and remove the rear spoiler assembly. |
|
3. REMOVE REAR SIDE SPOILER SUB-ASSEMBLY LH
| (a) Put protective tape around the rear side spoiler sub-assembly LH. |
|
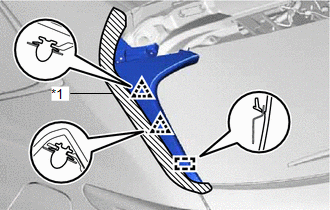
(b) Detach the 2 clips and guide and remove the rear spoiler sub-assembly LH.
4. REMOVE REAR SIDE SPOILER SUB-ASSEMBLY RH
HINT:
Use the same procedure described for the LH side.
READ NEXT:
 Disassembly
DISASSEMBLY PROCEDURE 1. REMOVE CENTER STOP LIGHT ASSEMBLY Click here 2. REMOVE REAR SPOILER NO. 2 PROTECTOR (a) Remove the 2 rear spoiler No. 2 protectors. 3. REMOVE PACKING (a) Remove the 3 packi
Reassembly
REASSEMBLY PROCEDURE 1. INSTALL PACKING (a) Install 3 new packings. 2. INSTALL REAR SPOILER NO. 2 PROTECTOR HINT: When installing the rear spoiler No. 2 protector, heat the rear spoiler assembly using
Installation
INSTALLATION PROCEDURE 1. INSTALL REAR SIDE SPOILER SUB-ASSEMBLY LH (a) Attach the 2 clips and guide to install the rear side spoiler sub-assembly LH. 2. INSTALL REAR SIDE SPOILER SUB-ASSEMBLY RH HINT
SEE MORE:
Installation
INSTALLATION PROCEDURE 1. INSTALL INTAKE MANIFOLD (a) Connect the purge line hose to the intake manifold, and slide the clamp to secure the hose. HINT: Make sure the hose clamp is oriented as shown in the illustration. *a Top *b Rear (b) Install the vacuum hose to th
System Diagram
SYSTEM DIAGRAM Transmitting ECU (Transmitter) Receiving ECU Signal Communication Method Skid control ECU (Brake booster with master cylinder assembly) Power steering ECU assembly
Target steering angle signal
Wheel speed signal
Vehicle speed signal
CAN communicatio
© 2016-2024 Copyright www.lexunx.com
