Lexus NX: Removal
REMOVAL
CAUTION / NOTICE / HINT
HINT:
- Use the same procedure for the RH and LH sides.
- The procedure listed below is for the LH side.
PROCEDURE
1. REMOVE ROOF HEADLINING ASSEMBLY
Click here .gif)
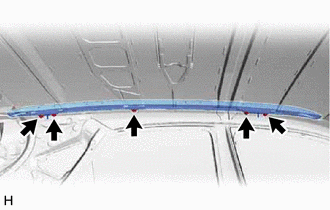
2. REMOVE ROOF RACK ASSEMBLY
| (a) Remove the 5 nuts and roof rack assembly. |
|
READ NEXT:
 Disassembly
DISASSEMBLY CAUTION / NOTICE / HINT HINT:
Use the same procedure for the RH and LH sides.
The procedure listed below is for the LH side.
PROCEDURE 1. REMOVE FRONT ROOF RACK LEG CUSHION LH (
Reassembly
REASSEMBLY CAUTION / NOTICE / HINT HINT:
Use the same procedure for the RH and LH sides.
The procedure listed below is for the LH side.
PROCEDURE 1. INSTALL NO. 2 ROOF CARRIER PROTECTOR (a) Cl
Installation
INSTALLATION CAUTION / NOTICE / HINT HINT:
Use the same procedure for the RH and LH sides.
The procedure listed below is for the LH side.
PROCEDURE 1. INSTALL ROOF RACK ASSEMBLY (a) Install th
SEE MORE:
Air Mix Damper Control Servo Motor Circuit (Passenger Side) (B1441)
DESCRIPTION The No. 1 air conditioning radiator damper servo sub-assembly (front passenger side air mix) sends pulse signals to indicate the damper position to the air conditioning amplifier assembly. The air conditioning amplifier assembly activates the motor (normal or reverse) based on these sign
On-vehicle Inspection
ON-VEHICLE INSPECTION PROCEDURE 1. INSPECT THROTTLE WITH MOTOR BODY ASSEMBLY (a) Put the engine in inspection mode (maintenance mode). Click here (b) Start the engine and check that the MIL is not illuminated. After the engine is warmed up, check that the idle speed is within the specified range w
© 2016-2024 Copyright www.lexunx.com
