Lexus NX: Removal
REMOVAL
CAUTION / NOTICE / HINT
HINT:
- Use the same procedure for the RH and LH sides.
- The procedure described below is for the LH side.
PROCEDURE
1. REMOVE FRONT BUMPER ASSEMBLY
(a) except Sport Package:
Click here .gif)
(b) for Sport Package:
Click here
2. REMOVE HEADLIGHT ASSEMBLY LH
(a) Apply protective tape around the headlight assembly LH.
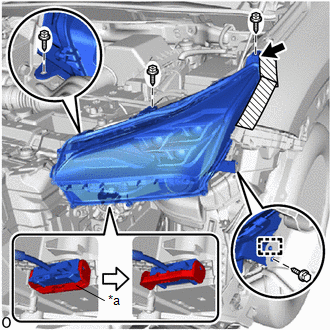
| *a | Connector Lock Lever |
.png) | Place Hands Here |
.png) | Protective Tape |
(b) Remove the 3 screws and bolt.
(c) Place your hand at the location indicated by the black arrow shown in the illustration, and disconnect the seat of the screw.
(d) Detach the guide and remove the headlight assembly LH.
(e) Release the connector lock lever and disconnect the connector.
READ NEXT:
 Disassembly
DISASSEMBLY PROCEDURE 1. PRECAUTION NOTICE:
Be sure to read Precaution thoroughly before servicing.
Click here
Do not reuse parts which have reduced fastening ability due to thread damage.
Wh
Adjustment
ADJUSTMENT CAUTION / NOTICE / HINT HINT:
Use the same procedure for the RH and LH sides.
The procedure listed below is for the LH side.
It is possible that a headlight assembly is incorrectly i
Reassembly
REASSEMBLY CAUTION / NOTICE / HINT NOTICE:
Handle components indoors as much as possible to prevent foreign matter from entering and adhering to headlight assembly components.
Do not reuse parts
SEE MORE:
How To Proceed With Troubleshooting
CAUTION / NOTICE / HINT HINT: *: Use the Techstream. PROCEDURE 1. VEHICLE BROUGHT TO WORKSHOP
NEXT 2. CUSTOMER PROBLEM ANALYSIS (a) Interview the customer and confirm the problem. Click here
NEXT 3. CHECK DTC AND FREEZE FRAME DATA* (a)
Customize Parameters
CUSTOMIZE PARAMETERS CUSTOMIZING WITH MULTI-DISPLAY ASSEMBLY (a) Turn the power switch on (IG). (b) Using the multi-display assembly, select "Setup", "General", and then feedback force and change the customize setting. Item Default Content Setting Relevant ECU Feedback Force 2 Set
© 2016-2024 Copyright www.lexunx.com
