Lexus NX: Removal
REMOVAL
CAUTION / NOTICE / HINT
HINT:
- Use the same procedure for the RH and LH sides.
- The procedure listed below is for the LH side.
PROCEDURE
1. REMOVE FRONT DOOR TRIM COVER LH
Click here .gif)
2. REMOVE FRONT DOOR INSIDE HANDLE BEZEL PLUG LH
Click here
3. REMOVE POWER WINDOW REGULATOR MASTER SWITCH ASSEMBLY WITH FRONT DOOR ARMREST BASE PANEL (for Driver Side)
Click here
4. REMOVE POWER WINDOW REGULATOR SWITCH ASSEMBLY WITH FRONT DOOR ARMREST BASE PANEL (for Front Passenger Side)
Click here
5. REMOVE FRONT DOOR TRIM BOARD SUB-ASSEMBLY LH
Click here
6. REMOVE OUTER MIRROR CONTROL ECU ASSEMBLY
| (a) Disconnect the 2 connectors. |
|
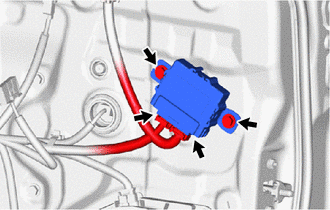
(b) Remove the 2 screws and outer mirror control ECU assembly.
READ NEXT:
 Installation
INSTALLATION CAUTION / NOTICE / HINT HINT:
Use the same procedure for the RH and LH sides.
The procedure listed below is for the LH side.
PROCEDURE 1. INSTALL OUTER MIRROR CONTROL ECU ASSEMBLY
Components
COMPONENTS ILLUSTRATION *1 OUTER MIRROR SWITCH ASSEMBLY *2 POWER WINDOW REGULATOR MASTER SWITCH ASSEMBLY WITH FRONT DOOR ARMREST BASE PANEL
SEE MORE:
Diagnostic Trouble Code Chart
DIAGNOSTIC TROUBLE CODE CHART Audio and Visual System DTC No. Detection Item Link B1323 Lost Communication with Haptic Device B1324 Lost Communication with Meter B1325 Lost Communication with HUD B1326 Lost Communication with Clock Device (Local-CAN)
Drive Motor "A" Inverter Voltage Sensor Circuit Range / Performance (P0D2E-565)
DTC SUMMARY MALFUNCTION DESCRIPTION VH voltage sensor signal malfunction in the inverter for the motor. Internal inverter malfunction
Internal circuit malfunction in the inverter for the motor
Malfunction in the sensors for inverter control (current sensor, voltage sensors (VH, VL), etc.)
DE
© 2016-2024 Copyright www.lexunx.com
