Lexus NX: Removal
REMOVAL
CAUTION / NOTICE / HINT
HINT:
- Use the same procedure for the RH and LH sides.
- The procedure listed below is for the LH side.
PROCEDURE
1. REMOVE FRONT DOOR TRIM COVER LH
Click here .gif)
2. REMOVE FRONT DOOR INSIDE HANDLE BEZEL PLUG LH
Click here
3. REMOVE POWER WINDOW REGULATOR MASTER SWITCH ASSEMBLY WITH FRONT DOOR ARMREST BASE PANEL
Click here
4. REMOVE FRONT DOOR TRIM BOARD SUB-ASSEMBLY LH
Click here
5. REMOVE FRONT NO. 1 SPEAKER ASSEMBLY
NOTICE:
Do not touch the cone part of the speaker.
| (a) Disconnect the connector. |
|
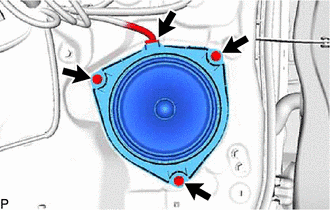
(b) Remove the 3 screws and front No. 1 speaker assembly.
READ NEXT:
 Inspection
INSPECTION PROCEDURE 1. INSPECT FRONT NO. 1 SPEAKER ASSEMBLY (a) Measure the resistance according to the value(s) in the table below. Standard Resistance: for 8 Speakers Tester Connection Con
Installation
INSTALLATION CAUTION / NOTICE / HINT HINT:
Use the same procedure for the RH and LH sides.
The procedure listed below is for the LH side.
PROCEDURE 1. INSTALL FRONT NO. 1 SPEAKER ASSEMBLY NOTI
SEE MORE:
Hybrid Battery System Discharge Time Too Long (P0C76-523)
DTC SUMMARY MALFUNCTION DESCRIPTION The hybrid vehicle control ECU detects that the electrical charge stored in the high-voltage condenser of the inverter with converter assembly cannot be discharged. The cause of this malfunction may be one of the following: Inside of inverter voltage sensor (VH)
Replacement
REPLACEMENT PROCEDURE 1. REPLACE HYBRID TRANSAXLE FLUID (a) Be sure that the vehicle remains level and lift the vehicle. [*1] (b) Remove the No. 1 engine under cover assembly. Click here (c) Using a 10 mm hexagon socket wrench, remove the filler plug and gasket from the hybrid vehicle transaxle
© 2016-2024 Copyright www.lexunx.com
