Lexus NX: Removal
REMOVAL
CAUTION / NOTICE / HINT
HINT:
- Use the same procedure for the RH and LH sides.
- The procedure listed below is for the LH side.
PROCEDURE
1. REMOVE REAR DOOR TRIM COVER LH
Click here .gif)
2. REMOVE REAR DOOR INSIDE HANDLE BEZEL PLUG LH
Click here
3. REMOVE REAR POWER WINDOW REGULATOR SWITCH ASSEMBLY WITH REAR DOOR ARMREST BASE PANEL
Click here
4. REMOVE REAR DOOR TRIM BOARD SUB-ASSEMBLY LH
Click here
5. REMOVE REAR SPEAKER ASSEMBLY
NOTICE:
Do not touch the cone part of the speaker.
| (a) Connect the connector. |
|
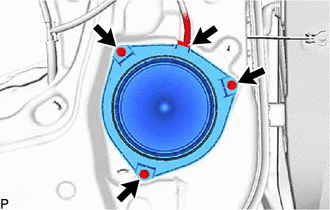
(b) Remove the 3 screws and rear speaker assembly.
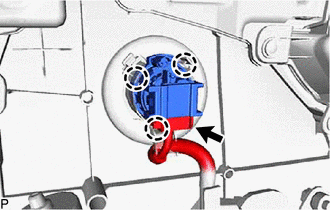
6. REMOVE REAR NO. 2 SPEAKER ASSEMBLY
NOTICE:
Do not touch the cone part of the speaker.
| (a) Detach the 3 claws and remove the rear No. 2 speaker assembly. |
|
READ NEXT:
 Inspection
INSPECTION PROCEDURE 1. INSPECT REAR SPEAKER ASSEMBLY (a) Measure the resistance according to the value(s) in the table below. Standard Resistance: for 8 Speakers Tester Connection Condition
Installation
INSTALLATION CAUTION / NOTICE / HINT HINT:
Use the same procedure for the RH and LH sides.
The procedure listed below is for the LH side.
PROCEDURE 1. INSTALL REAR NO. 2 SPEAKER ASSEMBLY NOTIC
SEE MORE:
Disassembly
DISASSEMBLY PROCEDURE 1. REMOVE MILLIMETER WAVE RADAR SENSOR ASSEMBLY Click here 2. REMOVE FRONT TELEVISION CAMERA ASSEMBLY (w/ Panoramic View Monitor System) Click here 3. REMOVE FRONT CENTER ULTRASONIC SENSOR (w/ Intuitive Parking Assist System) Click here 4. REMOVE FRONT BUMPER EXTENSION
Removal
REMOVAL PROCEDURE 1. REMOVE NO. 3 DECK BOARD SUB-ASSEMBLY Click here 2. REMOVE REAR DECK FLOOR BOX Click here 3. REMOVE DECK FLOOR BOX LH Click here 4. PRECAUTION CAUTION: Be sure to read Precaution thoroughly before servicing. Click here NOTICE: After the power switch is turned off, there m
© 2016-2024 Copyright www.lexunx.com
