Lexus NX: Removal
REMOVAL
CAUTION / NOTICE / HINT
CAUTION:
- Wear protective gloves. Sharp areas on the parts may injure your hands.
- If the side airbag was deployed, replace the front seat airbag assembly LH, separate type front seatback spring assembly, seatback felt, separate type front seatback cover and separate type front seatback pad with the necessary parts in accordance with the extent of the collision damage.
HINT:
- Use the same procedure for the RH and LH sides.
- The procedure listed below is for the LH side.
PROCEDURE
1. REMOVE NO. 3 DECK BOARD SUB-ASSEMBLY
Click here .gif)
2. REMOVE REAR DECK FLOOR BOX
Click here
3. REMOVE DECK FLOOR BOX LH
Click here
4. PRECAUTION
CAUTION:
Be sure to read Precaution thoroughly before servicing.
Click here
NOTICE:
After the power switch is turned off, there may be a waiting time before disconnecting the negative (-) auxiliary battery terminal.
Click here
5. DISCONNECT CABLE FROM NEGATIVE AUXILIARY BATTERY TERMINAL
CAUTION:
Wait at least 90 seconds after disconnecting the cable from the negative (-) auxiliary battery terminal to disable the SRS system.
(a) Loosen the nut and disconnect the cable from the negative (-) auxiliary battery terminal.
6. REMOVE FRONT SEAT ASSEMBLY LH
Click here
7. REMOVE FRONT SEAT LOWER CUSHION SHIELD
Click here
8. REMOVE FRONT SEAT CUSHION SHIELD LH
Click here
9. REMOVE FRONT SEAT INNER CUSHION SHIELD LH
Click here
10. REMOVE FRONT SEAT HEADREST SUPPORT
Click here
11. REMOVE SEPARATE TYPE FRONT SEATBACK COVER WITH PAD
Click here
12. REMOVE SEATBACK FELT
Click here
13. REMOVE FRONT SEAT AIRBAG ASSEMBLY LH
| (a) for Driver Side: (1) Detach the 3 wire harness clamps. (2) Detach the claw and disconnect the airbag connector. |
|
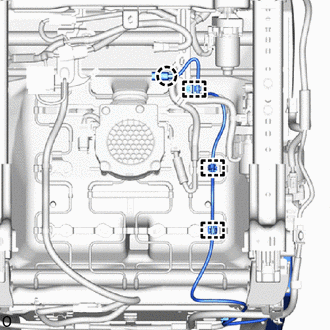
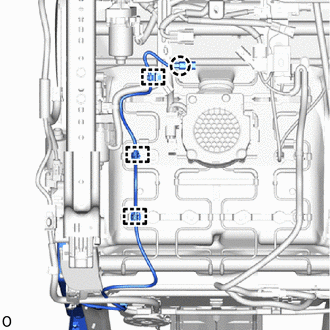
| (b) for Front Passenger Side: (1) Detach the 3 wire harness clamps. (2) Detach the claw and disconnect the airbag connector. |
|
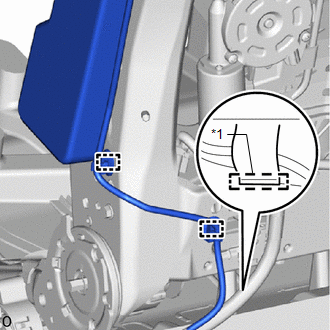
| (c) Detach the fastener and 2 wire harness clamps. |
|
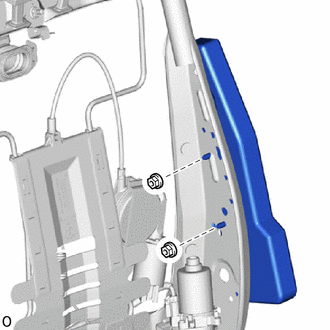
| (d) Remove the 2 nuts and front seat airbag assembly LH. CAUTION:
|
|
READ NEXT:
 Installation
INSTALLATION CAUTION / NOTICE / HINT CAUTION:
Wear protective gloves. Sharp areas on the parts may injure your hands.
If the side airbag was deployed, replace the front seat airbag assembly LH, s
Components
COMPONENTS ILLUSTRATION *1 DECK FLOOR BOX LH *2 NO. 3 DECK BOARD SUB-ASSEMBLY *3 REAR DECK FLOOR BOX *4 AUXILIARY BATTERY NEGATIVE TERMINAL N*m (kgf*cm, ft.*lbf): Specified
SEE MORE:
Data List / Active Test
DATA LIST / ACTIVE TEST DATA LIST HINT: Using the Techstream to read the Data List allows the values or states of switches, sensors, actuators and other items to be read without removing any parts. This non-intrusive inspection can be very useful because intermittent conditions or signals may be dis
Components
COMPONENTS ILLUSTRATION *1 AIR CLEANER CAP AND HOSE *2 EGR VALVE ASSEMBLY *3 NO. 1 ENGINE COVER SUB-ASSEMBLY *4 GASKET *5 NO. 1 EGR PIPE *6 NO. 1 WATER BY-PASS HOSE *7 NO. 2 WATER BY-PASS HOSE *8 FUEL VAPOR FEED HOSE *9 NO. 2 FUEL VAPOR FEED HOSE *10
