Lexus NX: Removal
REMOVAL
PROCEDURE
1. REMOVE ROOF HEADLINING ASSEMBLY
Click here .gif)
2. REMOVE BACK DOOR CENTER GARNISH
Click here
3. REMOVE BACK DOOR SIDE GARNISH LH
Click here
4. REMOVE BACK DOOR SIDE GARNISH RH
Click here
5. REMOVE BACK DOOR TRIM BASE (w/ Power Back Door)
Click here
6. REMOVE PULL HANDLE (w/ Power Back Door)
Click here
7. REMOVE BACK DOOR FINISH COVER LH (w/o Power Back Door)
Click here
8. REMOVE BACK DOOR FINISH COVER RH (w/o Power Back Door)
Click here
9. REMOVE BACK DOOR LOCK COVER (w/ Power Back Door)
Click here
10. REMOVE BACK DOOR LOCK COVER (w/o Power Back Door)
Click here
11. REMOVE BACK DOOR TRIM BOARD ASSEMBLY
Click here
12. REMOVE NO. 5 ANTENNA CORD SUB-ASSEMBLY
| (a) Disconnect the 4 connectors. |
|
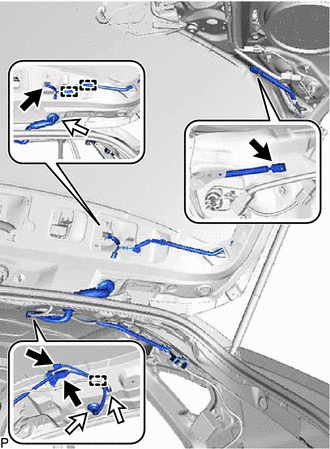
(b) Remove the washer hose from the clamp and detach the 3 clamps.
(c) Remove the 2 grommets and the No. 5 antenna cord sub-assembly.
READ NEXT:
 Installation
INSTALLATION PROCEDURE 1. INSTALL NO. 5 ANTENNA CORD SUB-ASSEMBLY (a) Install the 2 grommets. (b) Attach the 3 clamps and install the washer hose to the clamp. (c) Connect the 4 connectors and install
Components
COMPONENTS ILLUSTRATION *1 DECK FLOOR BOX LH *2 NO. 3 DECK BOARD SUB-ASSEMBLY *3 REAR DECK FLOOR BOX *4 NEGATIVE AUXILIARY BATTERY TERMINAL N*m (kgf*cm, ft.*lbf): Specified
SEE MORE:
Customize Parameters
CUSTOMIZE PARAMETERS CUSTOMIZE LANE TRACING ASSIST SYSTEM (w/ Lane Centering Function) NOTICE:
When the customer requests a change in a function, first make sure that the function can be customized.
Be sure to make a note of the current settings before customizing.
When troubleshooting a func
Trouble in Passenger Airbag ON/OFF Indicator
DESCRIPTION The occupant classification system detects the front passenger seat condition. It then displays the front passenger airbag condition (activated/not activated) using the passenger airbag ON/OFF indicator. HINT: Approximately 6 seconds after the power switch is turned on (IG), the passenge
