Lexus NX: Tires
Replace or rotate tires in accordance with maintenance schedules and treadwear.
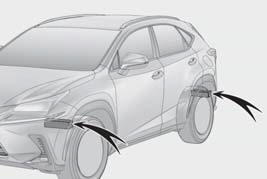
Checking tires
Check if the treadwear indicators are showing on the tires. Also check the tires for uneven wear, such as excessive wear on one side of the tread.
Check the spare tire condition and pressure if not rotated.
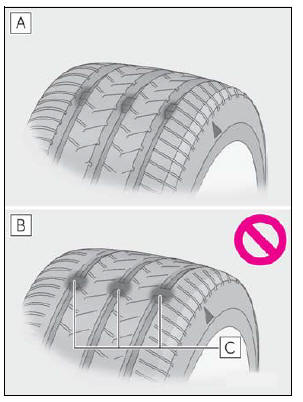
- New tread
- Worn tread
- Treadwear indicator
The location of treadwear indicators is
shown by a "TWI" or  mark, etc.,
molded into the sidewall of each tire.
mark, etc.,
molded into the sidewall of each tire.
Replace the tires if the treadwear indicators are showing on a tire.
■When to replace your vehicle's tires
Tires should be replaced if:
- The treadwear indicators are showing on a tire.
- You have tire damage such as cuts, splits, cracks deep enough to expose the fabric, and bulges indicating internal damage.
- A tire goes flat repeatedly or cannot be properly repaired due to the size or location of a cut or other damage.
If you are not sure, consult with your Lexus dealer.
■Tire life Any tire over 6 years old must be checked by a qualified technician even if it has seldom or never been used or damage is not obvious.
■Maximum load of tire Check that the maximum load of the replacement tire is greater than 1/2 of the Gross Axle Weight Ratings (GAWR) of either the front axle or the rear axle, whichever is greater.
For the GAWR, see the Certification Label.
For the maximum load of the tire, see the load limit at maximum cold tire inflation pressure mentioned on the sidewall of the tire.
■Tire types
- Summer tires
Summer tires are high-speed performance tires best suited to highway driving under dry conditions. Since summer tires do not have the same traction performance as snow tires, summer tires are inadequate for driving on snow-covered or icy roads. For driving on snow-covered roads or icy roads, the use of snow tires is recommended. When installing snow tires, be sure to replace all four tires. - All season tires
All season tires are designed to provide better traction in snow and to be adequate for driving in most winter conditions as well as for use year-round. All season tires, however, do not have adequate traction performance compared with snow tires in heavy or loose snow.Also, all season tires fall short in acceleration and handling performance compared with summer tires in highway driving.
- Snow tires
For driving on snow-covered roads or icy roads, we recommend using snow tires. If you need snow tires, select tires of the same size, construction and load capacity as the originally installed tires. Since your vehicle has radial tires as original equipment, make sure your snow tires also have radial construction. Do not install studded tires without first checking local regulations for possible restrictions.Snow tires should be installed on all wheels.
■If the tread on snow tires wears down below 0.16 in. (4 mm) The effectiveness of the tires as snow tires is lost.
WARNING
■When inspecting or replacing tires Observe the following precautions to prevent accidents.
Failure to do so may cause damage to parts of the drive train as well as dangerous handling characteristics, which may lead to an accident resulting in death or serious injury.
- Do not mix tires of different makes,
models or tread patterns.
Also, do not mix tires of remarkably different treadwear.
- Do not use tire sizes other than those recommended by Lexus.
- Do not mix differently constructed tires (radial, bias-belted or bias-ply tires).
- Do not mix summer, all season and snow tires.
- Do not use tires that have been used
on another vehicle.
Do not use tires if you do not know how they were used previously.
- Do not tow if your vehicle has a compact spare tire installed.
NOTICE
■Driving on rough roads Take particular care when driving on roads with loose surfaces or potholes.
These conditions may cause losses in tire inflation pressure, reducing the cushioning ability of the tires. In addition, driving on rough roads may cause damage to the tires themselves, as well as the vehicle's wheels and body.
■If tire inflation pressure of each tire becomes low while driving Do not continue driving, or your tires and/or wheels may be ruined.
Tire rotation
Rotate the tires in the order shown.
To equalize tire wear and extend tire life, Lexus recommends that tire rotation is carried out at the same interval as tire inspection.
Do not fail to initialize the tire pressure warning system after tire rotation.
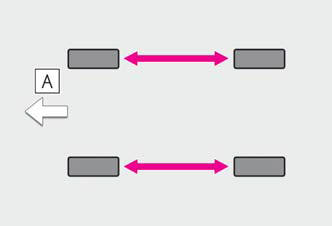
- Front
Tire pressure warning system
Your vehicle is equipped with a tire pressure warning system that uses tire pressure warning valves and transmitters to detect low tire inflation pressure before serious problems arise.
- If the tire pressure drops below a predetermined level, the driver is warned by a warning light.
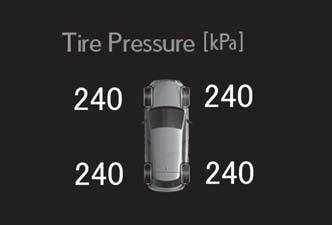
- The tire pressure detected by the tire pressure warning system can be displayed on the multi-information display.
■Routine tire inflation pressure checks The tire pressure warning system does not replace routine tire inflation pressure checks. Make sure to check tire inflation pressure as part of your routine of daily vehicle checks.
■Situations in which the tire pressure warning system may not operate properly
- In the following cases, the tire pressure
warning system may not operate properly.
- If non-genuine Lexus wheels are used.
- A tire has been replaced with a tire that is not an OE (Original Equipment) tire.
- A tire has been replaced with a tire that is not of the specified size.
- Tire chains etc. are equipped.
- An auxiliary-supported run-flat tire is equipped.
- If a window tint that affects the radio wave signals is installed.
- If there is a lot of snow or ice on the vehicle, particularly around the wheels or wheel housings.
- If the tire inflation pressure is extremely higher than the specified level.
- If wheel without the tire pressure warning valve and transmitter is used.
- If the ID code on the tire pressure warning valves and transmitters is not registered in the tire pressure warning computer.
- Performance may be affected in the following
situations.
- Near a TV tower, electric power plant, gas station, radio station, large display, airport or other facility that generates strong radio waves or electrical noise
- When carrying a portable radio, cellular phone, cordless phone or other wireless communication device
- When the vehicle is parked, the time taken for the warning to start or go off could be extended.
- When tire inflation pressure declines rapidly for example when a tire has burst, the warning may not function.
WARNING
■Caution regarding interference with electronic devices
- People with implantable cardiac pacemakers,
cardiac resynchronization
therapy-pacemakers or implantable
cardioverter defibrillators should not
come within 17.7 in. (450 mm) of the
tire pressure warning system initiators.
The radio waves may affect the operation of such devices.
- Users of any electrical medical device
other than implantable cardiac pacemakers,
cardiac resynchronization
therapy-pacemakers or implantable
cardioverter defibrillators should consult
the manufacturer of the device for
information about its operation under
the influence of radio waves.
Radio waves could have unexpected effects on the operation of such medical devices.
Installing tire pressure warning valves and transmitters
When replacing tires or wheels, tire pressure warning valves and transmitters must also be installed.
When new tire pressure warning valves and transmitters are installed, new ID codes must be registered in the tire pressure warning computer and the tire pressure warning system must be initialized. Have tire pressure warning valve and transmitter ID codes registered by your Lexus dealer.
■When replacing the tires and wheels If the ID code of the tire pressure warning valve and transmitter is not registered, the tire pressure warning system will not work properly. After driving for about 20 minutes, the tire pressure warning light blinks for 1 minute and stays on to indicate a system malfunction.
NOTICE
■Repairing or replacing tires, wheels, tire pressure warning valves, transmitters and tire valve caps
- When removing or fitting the wheels, tires or the tire pressure warning valves and transmitters, contact your Lexus dealer as the tire pressure warning valves and transmitters may be damaged if not handled correctly.
- Make sure to install the tire valve caps.
If the tire valve caps are not installed, water could enter the tire pressure warning valves and the tire pressure warning valves could be bound.
- When replacing tire valve caps, do not use tire valve caps other than those specified. The cap may become stuck.
■To avoid damage to the tire pressure warning valves and transmitters When a tire is repaired with liquid sealants, the tire pressure warning valve and transmitter may not operate properly. If a liquid sealant is used, contact your Lexus dealer or other qualified service shop as soon as possible. After use of liquid sealant, make sure to replace the tire pressure warning valve and transmitter when repairing or replacing the tire.
Initializing the tire pressure warning system
■ The tire pressure warning system must be initialized in the following circumstances:
- When adjusting the tire inflation pressure.
- When the tire inflation pressure is changed such as when changing traveling speed.
- When rotating the tires.
- When changing the tire.
When the tire pressure warning system is initialized, the current tire inflation pressure is set as the benchmark pressure.
■ How to initialize the tire pressure warning system
1. Park the vehicle in a safe place and turn the power switch off.
Initialization cannot be performed while the vehicle is moving.
2. Adjust the tire inflation pressure to the specified cold tire inflation pressure level.
Make sure to adjust the tire pressure to the specified cold tire inflation pressure level.
The tire pressure warning system will operate based on this pressure level.
3. Turn the power switch to ON mode.
4. Press or
or
 of the meter control
switches and select
of the meter control
switches and select  .
.
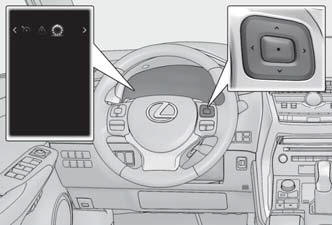
5. Press or
or of the meter control
switches, select the "Vehicle
Settings" and then press
of the meter control
switches, select the "Vehicle
Settings" and then press  .
.
6. Press or
or of the meter control
switches, select the "TPMS"
and then press and hold the
of the meter control
switches, select the "TPMS"
and then press and hold the  .
.
The "Tire Pressure Recalibrating. Please Wait Until Complete" will be displayed on the multi-information display and the tire pressure warning light will blink slowly 3 times.
When the message disappears, initialization is complete.
■Initializing the tire pressure warning system Initialize the system with the tire inflation pressure adjusted to the specified level
■The initialization operation
- Make sure to carry out initialization after adjusting the tire inflation pressure. Also, make sure the tires are cold before carrying out initialization or tire inflation pressure adjustment.
- If you have accidentally turned the power switch off during initialization, it is not necessary to press the reset switch again as initialization will restart automatically when the power switch has been turned to ON mode for the next time.
- If you accidentally press the reset switch when initialization is not necessary, adjust the tire inflation pressure to the specified level when the tires are cold, and conduct initialization again.
■Warning performance of the tire pressure warning system The warning of the tire pressure warning system will change in accordance with the conditions under which it was initialized. For this reason, the system may give a warning even if the tire pressure does not reach a low enough level, or if the pressure is higher than the pressure that was adjusted to when the system was initialized.
■When initialization of the tire pressure warning system has failed Initialization can be completed in a few minutes.
However, in the following cases, the settings have not been recorded and the system will not operate properly. If repeated attempts to record tire inflation pressure settings are unsuccessful, have the vehicle inspected by your Lexus dealer.
- When initializing the tire pressure warning system, the tire pressure warning light does not blink 3 times.
- After carrying out the initialization procedure, the tire pressure warning light blinks for 1 minute then stays on after driving for 20 minutes.
WARNING
■When initializing the tire pressure warning system Do not initializing tire inflation pressure without first adjusting the tire inflation pressure to the specified level. Otherwise, the tire pressure warning light may not come on even if the tire inflation pressure is low, or it may come on when the tire inflation pressure is actually normal.
Registering ID codes
The tire pressure warning valve and transmitter is equipped with a unique ID code. When replacing a tire pressure warning valve and transmitter, it is necessary to register the ID code.
Have the ID code registered by your Lexus dealer.
READ NEXT:
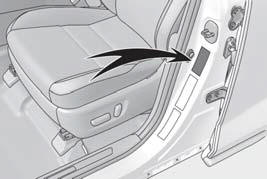
 Tire inflation pressure
Checking the specified tire inflation
pressure
The recommended cold tire inflation
pressure and tire size are displayed on
the tire and loading information label.
Inspection and adjustment proc
Wheels
If a wheel is bent, cracked or heavily
corroded, it should be replaced.
Otherwise, the tire may separate
from the wheel or cause a loss of
handling control.
Wheel selection
When replacing whee
Air conditioning filter
The air conditioning filter must be
changed regularly to maintain air
conditioning efficiency.
Removal method
1. Turn the power switch off.
2. Open the glove box. Slide off the
damper.
3. P
SEE MORE:
Customize Parameters
CUSTOMIZE PARAMETERS CUSTOMIZE METER / GAUGE SYSTEM (a) Customizing with the Techstream (1) Connect the Techstream to the DLC3. (2) Turn the power switch on (IG). (3) Turn the Techstream on. (4) Enter the following menus: Customize Setting / Warning or Display. (5) Select the setting by referring to
Installation
INSTALLATION PROCEDURE 1. INSTALL RADIATOR GRILLE SUB-ASSEMBLY (a) Attach the 14 claws and the 4 guides to install the radiator grille sub-assembly. (b) Install the 2 outside moulding retainers. (c) Install the 6 screws. Screw Outside Moulding Retainer 2. INSTALL FRONT BUMPER GUARD AS
