Lexus NX: Washer Nozzle
Components
COMPONENTS
ILLUSTRATION
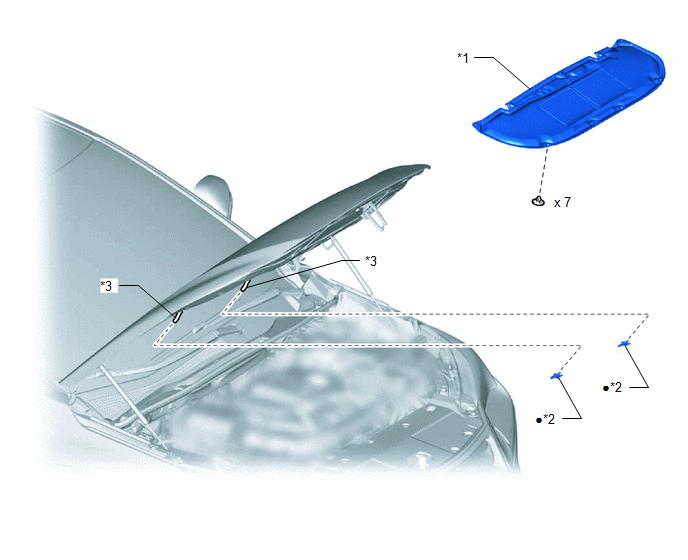
| *1 | HOOD INSULATOR | *2 | WASHER NOZZLE SUB-ASSEMBLY |
| *3 | WASHER HOSE | - | - |
| ● | Non-reusable part | - | - |
On-vehicle Inspection
ON-VEHICLE INSPECTION
PROCEDURE
1. INSPECT WASHER NOZZLE SUB-ASSEMBLY
(a) With the power switch turned on (IG), check the position that the washer fluid hits the windshield.
OK:
Washer fluid hits the windshield in the areas shown in the illustration.

| *a | Upper Limit | *b | Standard |
| *c | Lower Limit | - | - |
Standard:
| Area | Measurement | Area | Measurement |
|---|---|---|---|
| A | 120 mm (4.7244 in.) | B | 265 mm (10.4331 in.) |
| C | 192 mm (7.5590 in.) | - | - |
NOTICE:
If the result is not as specified, replace the washer nozzle sub-assembly.
Adjustment
ADJUSTMENT
PROCEDURE
1. REMOVE WASHER NOZZLE SUB-ASSEMBLY
Click here .gif)
2. ADJUST WASHER NOZZLE SUB-ASSEMBLY
(a) Select a washer nozzle so that the contact area is within the standard. Replace the washer nozzle sub-assembly with the selected one.
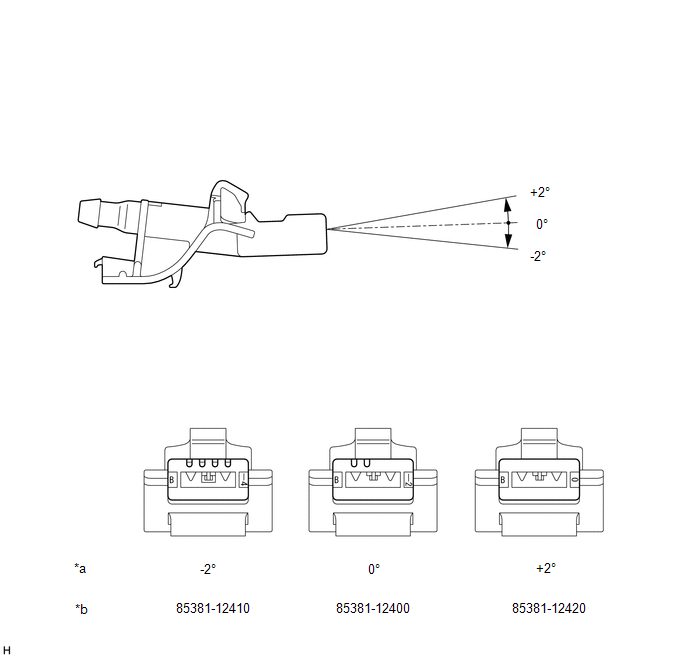
| *a | Washer Fluid Spray Angle | *b | Nozzle Part Number |
3. INSTALL WASHER NOZZLE SUB-ASSEMBLY
Click here
Removal
REMOVAL
PROCEDURE
1. REMOVE HOOD INSULATOR
Click here .gif)
2. REMOVE WASHER NOZZLE SUB-ASSEMBLY
HINT:
Use the same procedure for both washer nozzle sub-assemblies.
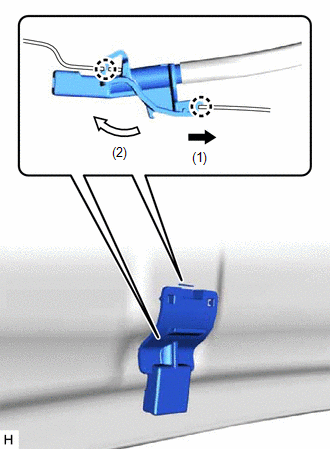
| (a) Using a screwdriver with its tip wrapped in protective tape, detach the 2 claws in the order shown in the illustration. NOTICE: Do not damage the windshield glass. HINT: Tape the screwdriver tip before use. |
|
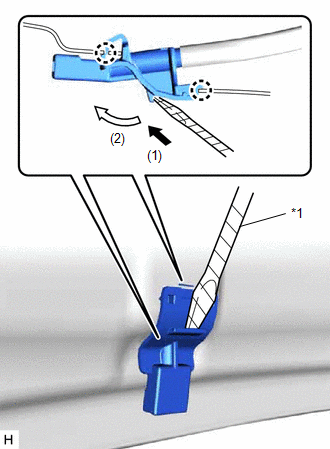
| (b) Disconnect the washer nozzle sub-assembly from the washer hose and remove the washer nozzle sub-assembly. NOTICE: Washer nozzle sub-assembly cannot be reused. |
|
Installation
INSTALLATION
PROCEDURE
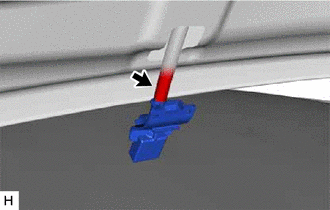
1. INSTALL WASHER NOZZLE SUB-ASSEMBLY
HINT:
Use the same procedure for both washer nozzle sub-assemblies.
(a) Connect a new washer nozzle sub-assembly to the washer hose.
| (b) Attach the 2 claws in the order shown in the illustration to install a new washer nozzle sub-assembly. |
|
2. INSPECT WASHER NOZZLE SUB-ASSEMBLY
Click here .gif)
3. ADJUST WASHER NOZZLE SUB-ASSEMBLY
Click here
4. INSTALL HOOD INSULATOR
Click here
READ NEXT:
 Washer Nozzle(for Rear Side)
ComponentsCOMPONENTS ILLUSTRATION *1 REAR WASHER NOZZLE *2 REAR WASHER HOSE On-vehicle InspectionON-VEHICLE INSPECTION PROCEDURE 1. INSPECT REAR WASHER NOZZLE (a) With the power switch
Precaution
PRECAUTION PRECAUTION OF WASHER NOZZLE ADJUSTMENT (a) Do not clean or adjust the washer nozzle with a safety pin, etc. because: (1) The washer nozzle tip is made of resin and could be damaged. (2) Adj
SEE MORE:
Components
COMPONENTS ILLUSTRATION *1 DECK FLOOR BOX LH *2 NO. 3 DECK BOARD SUB-ASSEMBLY *3 REAR DECK FLOOR BOX *4 AUXILIARY BATTERY NEGATIVE TERMINAL N*m (kgf*cm, ft.*lbf): Specified torque - - ILLUSTRATION *1 FRONT AIRBAG SENSOR LH - - N*m (kgf*cm, ft.*lbf):
Oxygen (A/F) Sensor Pumping Current Circuit / Open (for A/F sensor) (Bank 1 Sensor 1) (P2237-P2239,P2252,P2253)
DESCRIPTION Refer to DTC P2195. Click here DTC No. Detection Item DTC Detection Condition Trouble Area MIL Memory P2237 Oxygen (A/F) Sensor Pumping Current Circuit / Open (for A/F sensor) (Bank 1 Sensor 1) An open in the circuit between terminals A1A+ and A1A- of the air fuel
