Lexus NX: Components
COMPONENTS
ILLUSTRATION
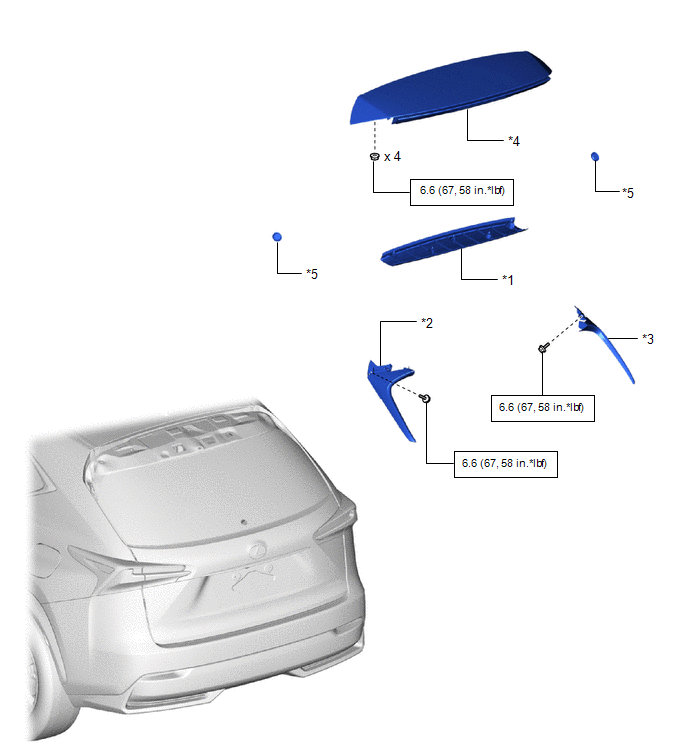
| *1 | BACK DOOR CENTER GARNISH | *2 | REAR SIDE SPOILER SUB-ASSEMBLY LH |
| *3 | REAR SIDE SPOILER SUB-ASSEMBLY RH | *4 | REAR SPOILER ASSEMBLY |
| *5 | HOLE PLUG | - | - |
.png) | N*m (kgf*cm, ft.*lbf): Specified torque | - | - |
ILLUSTRATION
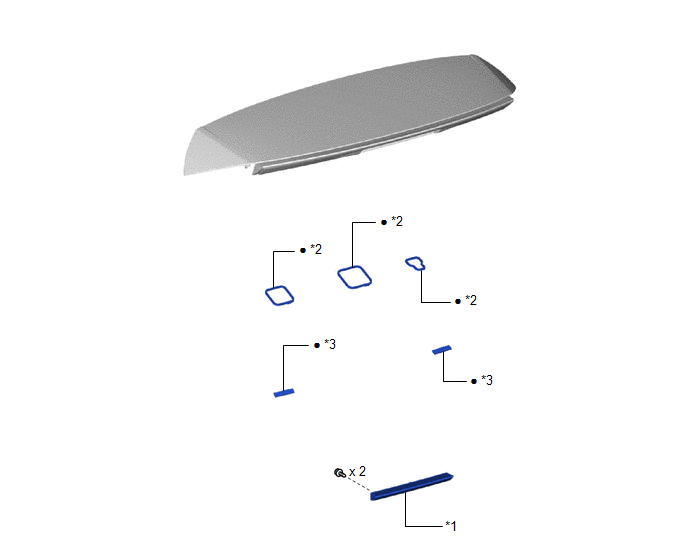
| *1 | CENTER STOP LIGHT ASSEMBLY | *2 | PACKING |
| *3 | REAR SPOILER NO. 2 PROTECTOR | - | - |
| ● | Non-reusable part | - | - |
READ NEXT:
 Removal
REMOVAL PROCEDURE 1. REMOVE BACK DOOR CENTER GARNISH Click here 2. REMOVE REAR SPOILER ASSEMBLY (a) Remove the 2 hole plugs. Nut Bolt Connector (b) Remove the 4 nuts. (c) Re
Disassembly
DISASSEMBLY PROCEDURE 1. REMOVE CENTER STOP LIGHT ASSEMBLY Click here 2. REMOVE REAR SPOILER NO. 2 PROTECTOR (a) Remove the 2 rear spoiler No. 2 protectors. 3. REMOVE PACKING (a) Remove the 3 packi
Reassembly
REASSEMBLY PROCEDURE 1. INSTALL PACKING (a) Install 3 new packings. 2. INSTALL REAR SPOILER NO. 2 PROTECTOR HINT: When installing the rear spoiler No. 2 protector, heat the rear spoiler assembly using
SEE MORE:
Display Disconnected (B15D6)
DESCRIPTION The multi-display assembly and radio receiver assembly are connected by the AVC-LAN communication line. This DTC is stored when an AVC-LAN communication error occurs between the multi-display assembly and radio receiver assembly. DTC No. Detection Item DTC Detection Condition Tr
Installation
INSTALLATION CAUTION / NOTICE / HINT HINT:
Use the same procedure for the RH and LH sides.
The procedure listed below is for the LH side.
PROCEDURE 1. INSTALL FRONT NO. 1 SPEAKER ASSEMBLY NOTICE: Do not touch the cone part of the speaker. (a) Temporarily install the speaker by attaching t
© 2016-2024 Copyright www.lexunx.com
