Lexus NX: Components
COMPONENTS
ILLUSTRATION
.png)
| *1 | DECK FLOOR BOX LH | *2 | NO. 3 DECK BOARD SUB-ASSEMBLY |
| *3 | REAR DECK FLOOR BOX | *4 | AUXILIARY BATTERY NEGATIVE TERMINAL |
.png) | N*m (kgf*cm, ft.*lbf): Specified torque | - | - |
ILLUSTRATION
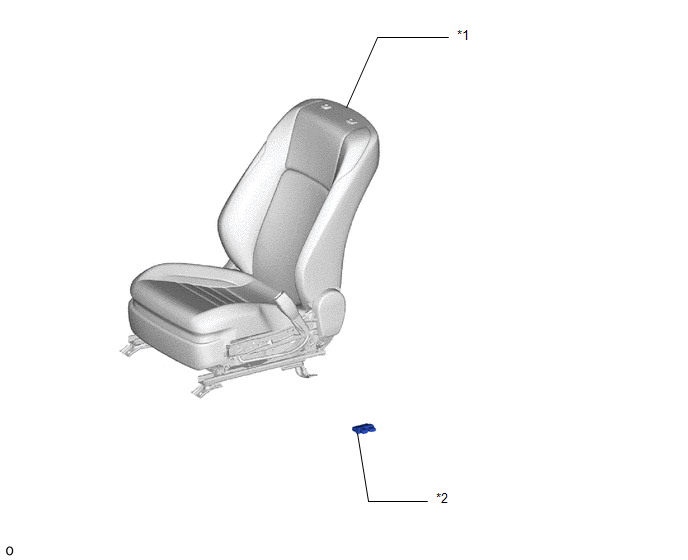
| *1 | FRONT SEAT ASSEMBLY RH | *2 | OCCUPANT DETECTION ECU |
READ NEXT:
 On-vehicle Inspection
ON-VEHICLE INSPECTION CAUTION / NOTICE / HINT CAUTION: Be sure to follow the correct removal and installation procedures of the occupant classification ECU. PROCEDURE 1. INSPECT OCCUPANT DETECTION ECU
Removal
REMOVAL PROCEDURE 1. REMOVE NO. 3 DECK BOARD SUB-ASSEMBLY Click here 2. REMOVE REAR DECK FLOOR BOX Click here 3. REMOVE DECK FLOOR BOX LH Click here 4. PRECAUTION CAUTION: Be sure to read Precau
Installation
INSTALLATION PROCEDURE 1. INSTALL OCCUPANT DETECTION ECU (a) Attach the claw to install the occupant detection ECU. NOTICE: If the occupant detection ECU has been dropped, or there are any cracks, den
SEE MORE:
Seat Heater for Front Right Seat does not Operate
DESCRIPTION When the seat heater switch on air conditioning control assembly is operated, the air conditioning amplifier assembly receives the signal. The air conditioning amplifier assembly receives the signal and operates the front seat heater. WIRING DIAGRAM CAUTION / NOTICE / HINT NOTICE:
If
Rear Center Seat Outer Belt Assembly
ComponentsCOMPONENTS ILLUSTRATION *1 REAR CENTER SEAT OUTER BELT ASSEMBLY *2 SEAT BELT ANCHOR COVER N*m (kgf*cm, ft.*lbf): Specified torque - - RemovalREMOVAL PROCEDURE 1. REMOVE SEAT BELT ANCHOR COVER (a) Using moulding remover D, detach the 2 claws. (b) Det
© 2016-2024 Copyright www.lexunx.com
