Lexus NX: Rear Center Seat Outer Belt Assembly
Components
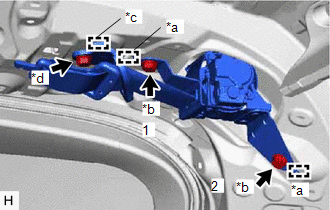
COMPONENTS
ILLUSTRATION
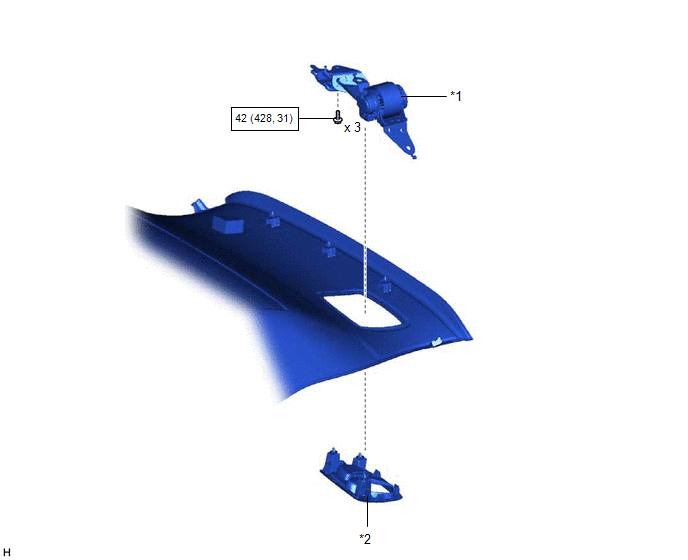
| *1 | REAR CENTER SEAT OUTER BELT ASSEMBLY | *2 | SEAT BELT ANCHOR COVER |
.png) | N*m (kgf*cm, ft.*lbf): Specified torque | - | - |
Removal
REMOVAL
PROCEDURE
1. REMOVE SEAT BELT ANCHOR COVER
| (a) Using moulding remover D, detach the 2 claws. |
|
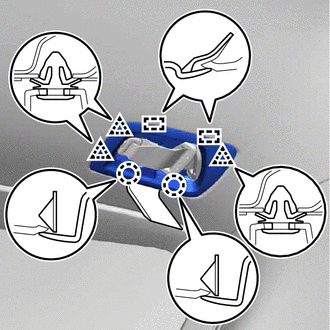
(b) Detach the 3 clips, 2 guides and remove the seat belt anchor cover.
2. REMOVE ROOF HEADLINING ASSEMBLY
Click here .gif)
3. REMOVE REAR CENTER SEAT OUTER BELT ASSEMBLY
| (a) Remove the bolt (A). |
|
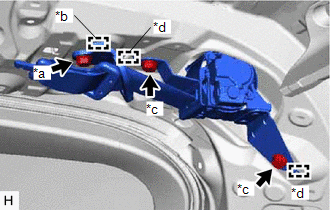
(b) Detach the guide (A) and remove the shoulder anchor of the rear center seat outer belt assembly.
(c) Remove the 2 bolts (B).
(d) Detach the 2 guides (B) and remove the rear center seat outer belt assembly.
Inspection
INSPECTION
PROCEDURE
1. INSPECT REAR CENTER SEAT OUTER BELT ASSEMBLY
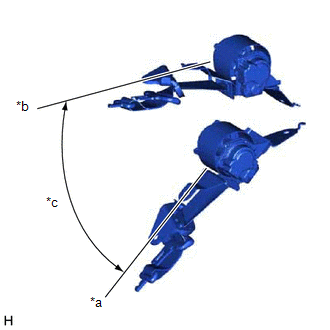
| (a) Before installing the rear center seat outer belt assembly, check the ELR function. NOTICE: Do not disassemble the retractor. (1) When the inclination of the retractor is between 19° and 33°, check that the belt can be pulled from the retractor. When the inclination of the retractor is less 19° or more than 33°, check that the belt locks. If the result is not as specified, replace the rear center seat outer belt assembly. |
|
Installation
INSTALLATION
PROCEDURE
1. INSTALL REAR CENTER SEAT OUTER BELT ASSEMBLY
| (a) Attach the 2 guides (A) and temporarily install the rear center seat outer belt assembly with the 2 bolts (A). |
|
(b) Tighten the 2 bolts (A) in the order shown in the illustration.
Torque:
42 N·m {428 kgf·cm, 31 ft·lbf}
(c) Attach the guide (B) and install the shoulder anchor part of the rear center seat outer belt assembly with the bolt (B).
Torque:
42 N·m {428 kgf·cm, 31 ft·lbf}
2. INSTALL ROOF HEADLINING ASSEMBLY
Click here .gif)
3. INSTALL SEAT BELT ANCHOR COVER
(a) Attach the 2 guides.
(b) Attach the 3 clips, 2 claws and install the rear center seat outer belt assembly.
READ NEXT:
 Removal
REMOVAL PROCEDURE 1. REMOVE REAR SEAT ASSEMBLY (for Manual Seat) Click here 2. REMOVE REAR SEAT ASSEMBLY (for Power Seat) Click here 3. REMOVE REAR SEAT INNER WITH CENTER BELT ASSEMBLY RH (a) f
Inspection
INSPECTION PROCEDURE 1. INSPECT REAR SEAT INNER WITH CENTER BELT ASSEMBLY RH (a) for Manual Seat: (1) w/o Seat Heater System: Measure the resistance according to the value(s) in the table below. St
SEE MORE:
Open Circuit in Stop Light Switch Circuit (C1249)
DESCRIPTION The skid control ECU (brake booster with master cylinder assembly) receives the stop light switch assembly signal and detects the brake pedal operation status. The skid control ECU (brake booster with master cylinder assembly) has an open detection circuit, which stores this DTC if it de
Installation
INSTALLATION PROCEDURE 1. INSTALL NO. 3 MOTOR WATER JACKET COVER ASSEMBLY (a) Remove any remaining seal packing from the transaxle housing installation surface and bolt holes. NOTICE:
Clean and degrease the installation surface and bolt holes.
Do not allow any remaining seal packing to enter th
