Lexus NX: Disassembly
DISASSEMBLY
PROCEDURE
1. REMOVE KICK DOOR CONTROL BRACKET (w/ Hands Free Power Back Door)
Click here .gif)
2. REMOVE KICK DOOR CONTROL SENSOR (w/ Hands Free Power Back Door)
Click here
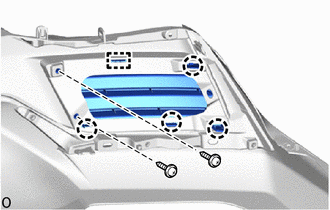
3. REMOVE NO. 2 LUGGAGE ROOM WIRE
(a) w/ Intuitive Parking Assist System:
Disconnect the 4 connectors.
NOTICE:
Do not apply excessive loads to the retainer. Otherwise, it may peel off.
HINT:
Disconnect the connector while pressing the ultrasonic sensor with your hand.
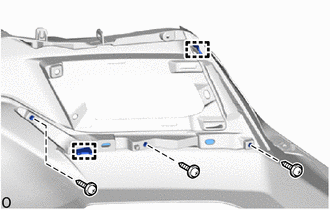
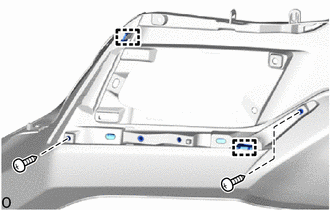
(b) w/o Hands Free Power Back Door:
Detach the 6 clamps and remove the No. 2 luggage room wire.
(c) w/ Hands Free Power Back Door:
Detach the 10 clamps and remove the No. 2 luggage room wire.
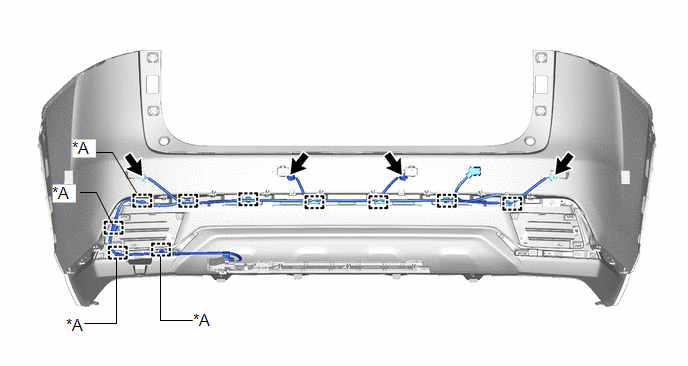
| *A | w/ Hands Free Power Back Door | - | - |
4. REMOVE REAR CORNER ULTRASONIC SENSOR (w/ Intuitive Parking Assist System)
Click here
5. REMOVE REAR CENTER ULTRASONIC SENSOR (w/ Intuitive Parking Assist System)
Click here
6. REMOVE REAR CORNER ULTRASONIC SENSOR RETAINER (w/ Intuitive Parking Assist System)
Click here
7. REMOVE REAR CENTER ULTRASONIC SENSOR RETAINER (w/ Intuitive Parking Assist System)
Click here
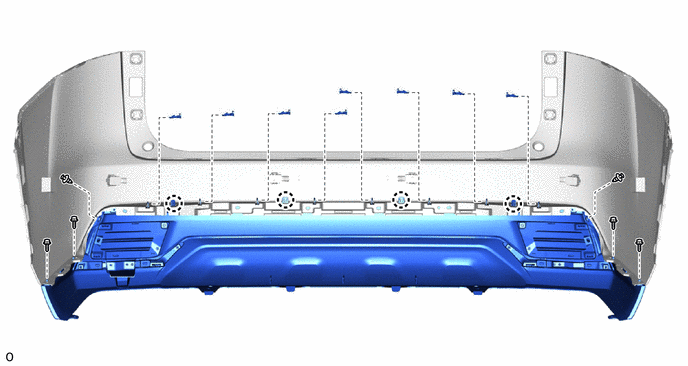
8. REMOVE REAR BUMPER LOWER COVER
(a) Remove the 4 screws.
(b) Remove the 2 clips.
(c) Remove the 8 outside moulding retainers.
(d) Detach the 4 claws and remove the rear bumper lower cover.
9. REMOVE REFLEX REFLECTOR ASSEMBLY LH
| (a) Remove the screw. |
|
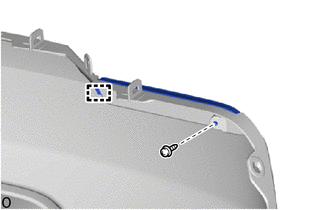
(b) Detach the guide and remove the reflex reflector assembly LH.
10. REMOVE REFLEX REFLECTOR ASSEMBLY RH
HINT:
Use the same procedure described for the LH side.
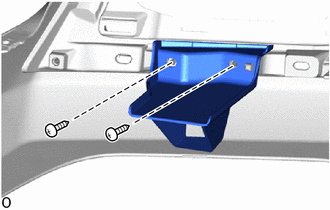
11. REMOVE REAR BUMPER CORNER EXTENSION RH
| (a) Remove the 2 screws and the rear bumper corner extension RH. |
|
12. REMOVE REAR BUMPER LOWER SIDE RETAINER LH
| (a) Remove the 2 screws. |
|
(b) Detach the 4 claws and guide and remove the rear bumper lower side retainer LH.
13. REMOVE REAR BUMPER LOWER SIDE RETAINER RH
HINT:
Use the same procedure described for the LH side.
14. REMOVE REAR BUMPER LOWER RETAINER LH
| (a) Remove the 3 screws. |
|
(b) Detach the 2 guides and remove the rear bumper lower retainer LH.
15. REMOVE REAR BUMPER LOWER RETAINER RH
| (a) Remove the 2 screws. |
|
(b) Detach the 2 guides and remove the rear bumper lower retainer RH.
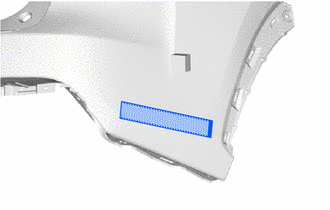
16. REMOVE NO. 1 MOULDING TAPE
HINT:
- When removing the No. 1 moulding tape, heat the rear bumper cover and No. 1 moulding tape using a heat light.
- Use the same procedure described for the other side.
Standard:
| Item | Temperature |
|---|---|
| Rear Bumper Cover | 20 to 30°C (68 to 86°F) |
| No. 1 Moulding Tape | 20 to 30°C (68 to 86°F) |
NOTICE:
Do not heat the rear bumper cover and No. 1 moulding tape excessively.
| (a) Remove the No. 1 moulding tape. |
|
17. REMOVE REAR BUMPER PAD
HINT:
- When removing the rear bumper pad, heat the rear bumper cover and rear bumper pad using a heat light.
- Use the same procedure described for the other side.
Standard:
| Item | Temperature |
|---|---|
| Rear Bumper Cover | 20 to 30°C (68 to 86°F) |
| Rear Bumper Pad | 20 to 30°C (68 to 86°F) |
NOTICE:
Do not heat the rear bumper cover and rear bumper pad excessively.
| (a) Remove the rear bumper pad. |
|
READ NEXT:
 Reassembly
REASSEMBLY PROCEDURE 1. INSTALL REAR BUMPER PAD HINT:
When installing the rear bumper pad, heat the rear bumper cover and rear bumper pad using a heat light.
Use the same procedure described for
Installation
INSTALLATION PROCEDURE 1. INSTALL REAR BUMPER SIDE SUPPORT LH (a) Attach the 2 claws to install the rear bumper side support LH. (b) Attach the clip. (c) Install the screw. 2. INSTALL R
SEE MORE:
Parts Location
PARTS LOCATION ILLUSTRATION *1 AIR CONDITIONING CONTROL ASSEMBLY - REAR WINDOW DEFOGGER SWITCH *2 INSTRUMENT PANEL JUNCTION BLOCK ASSEMBLY - ECU-IG NO.1 FUSE - ECU-IG NO.3 FUSE *3 DLC3 - - ILLUSTRATION *1 DEFOGGER RELAY *2 AIR CONDITIONING AMPLIFIER ASSEMBLY *3
Components
COMPONENTS ILLUSTRATION *1 DECK FLOOR BOX LH *2 NO. 3 DECK BOARD SUB-ASSEMBLY *3 REAR DECK FLOOR BOX *4 AUXILIARY BATTERY NEGATIVE TERMINAL N*m (kgf*cm, ft.*lbf): Specified torque - - ILLUSTRATION *1 HEADLIGHT DIMMER SWITCH ASSEMBLY *2 TILT AND TELESCOPIC
