Lexus NX: Disassembly
DISASSEMBLY
CAUTION / NOTICE / HINT
HINT:
- Use the same procedure for the RH and LH sides.
- The procedure listed below is for the LH side.
PROCEDURE
1. REMOVE NO. 5 MOULDING TAPE
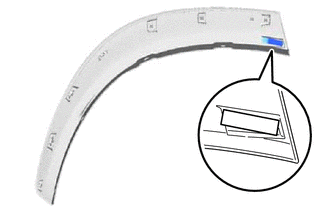
(a) Remove the No. 5 moulding tape (double-sided tape).
HINT:
Do not pull on the No. 5 moulding tape (double-sided tape). Instead, roll the tape up with your finger to remove it cleanly.
.png)
(b) Using non-residue solvent and a cloth, wipe off any No. 5 moulding tape (double-sided tape) remaining on the quarter outside moulding sub-assembly LH.
2. REMOVE REAR LOWER QUARTER MOULDING PROTECTOR LH
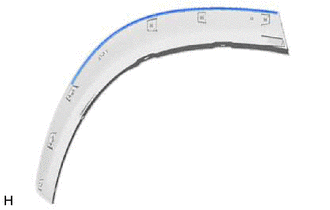
(a) Remove the rear lower quarter moulding protector LH (double-sided tape).
HINT:
Do not pull on the rear lower quarter moulding protector LH (double-sided tape). Instead, roll the tape up with your finger to remove it cleanly.
(b) Using non-residue solvent and a cloth, wipe off any rear lower quarter moulding protector LH (double-sided tape) remaining on the quarter outside moulding sub-assembly LH.
READ NEXT:
 Reassembly
REASSEMBLY CAUTION / NOTICE / HINT HINT:
Use the same procedure for the RH and LH sides.
The procedure listed below is for the LH side.
PROCEDURE 1. INSTALL NO. 5 MOULDING TAPE (a) Clean the N
Installation
INSTALLATION CAUTION / NOTICE / HINT PROCEDURE 1. INSTALL QUARTER OUTSIDE MOULDING SUB-ASSEMBLY LH HINT: When installing the quarter outside moulding sub-assembly LH, heat the vehicle body and quarter
SEE MORE:
Steering Angle Sensor
ComponentsCOMPONENTS ILLUSTRATION *A w/o Steering Heater *B w/ Steering Heater *1 STEERING SENSOR *2 SPIRAL CABLE SUB-ASSEMBLY RemovalREMOVAL PROCEDURE 1. REMOVE SPIRAL W/SENSOR CABLE SUB-ASSEMBLY Click here 2. REMOVE STEERING SENSOR (a) Disengage the 6 claws and 2 pi
Noise Occurs
PROCEDURE 1. CHECK NOISE CONDITION (a) Check from which direction the noise comes (front left or right, or rear left or right). OK: The location of the noise source can be determined. NG GO TO STEP 3
OK 2. CHECK SPEAKERS (a) Check the installation condi
