Lexus NX: Inspection
INSPECTION
CAUTION / NOTICE / HINT
HINT:
- Use the same procedure for the RH and LH sides.
- The procedure listed below is for the LH side.
PROCEDURE
1. INSPECT REAR NO. 1 SUSPENSION ARM ASSEMBLY LH
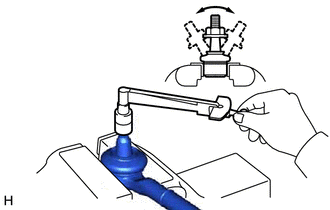
(a) Inspect the turning torque of the ball joint.
(1) Install the installation nut to the ball joint stud.
(2) Move the stud back and forth 5 times. Using a torque wrench, turn the nut continuously at a rate of 2 to 4 seconds per turn and take the torque reading on the fifth turn.
Standard turning torque:
0.5 to 3.4 N*m (5.1 to 35 kgf*cm, 4.4 to 30 in.*lbf)
If the turning torque is not within the specified range, replace the rear No. 1 suspension arm with a new one.
(b) Check the dust boots for cracks or grease leakage.
READ NEXT:
 Installation
INSTALLATION CAUTION / NOTICE / HINT HINT:
Use the same procedure for the RH and LH sides.
The procedure listed below is for the LH side.
PROCEDURE 1. INSTALL REAR NO. 1 SPRING BUMPER LH (a
Components
COMPONENTS ILLUSTRATION *A w/o AVS - - *1 REAR NO. 1 SHOCK ABSORBER BRACKET LH *2 REAR SHOCK ABSORBER ASSEMBLY LH *3 REAR SUSPENSION ARM COVER LH - N*m (kgf*c
SEE MORE:
Components
COMPONENTS ILLUSTRATION *1 ENGINE HOOD LOCK STRIKER ASSEMBLY *2 HOOD AUXILIARY CATCH HOOK ASSEMBLY *3 HOOD INSULATOR *4 HOOD TO FRONT FENDER SEAL LH *5 HOOD TO FRONT FENDER SEAL RH *6 RADIATOR SUPPORT OPENING COVER *7 WASHER HOSE ASSEMBLY *8 WASHER NOZZLE SUB-
Replacement
REPLACEMENT PROCEDURE 1. RECOVER REFRIGERANT FROM REFRIGERATION SYSTEM (a) Turn the power switch on (READY). (b) Operate the cooler compressor under the conditions shown below: Item Condition Operating time 3 minutes or more Temperature setting Max cool Blower speed High E
© 2016-2024 Copyright www.lexunx.com
