Lexus NX: Components
COMPONENTS
ILLUSTRATION
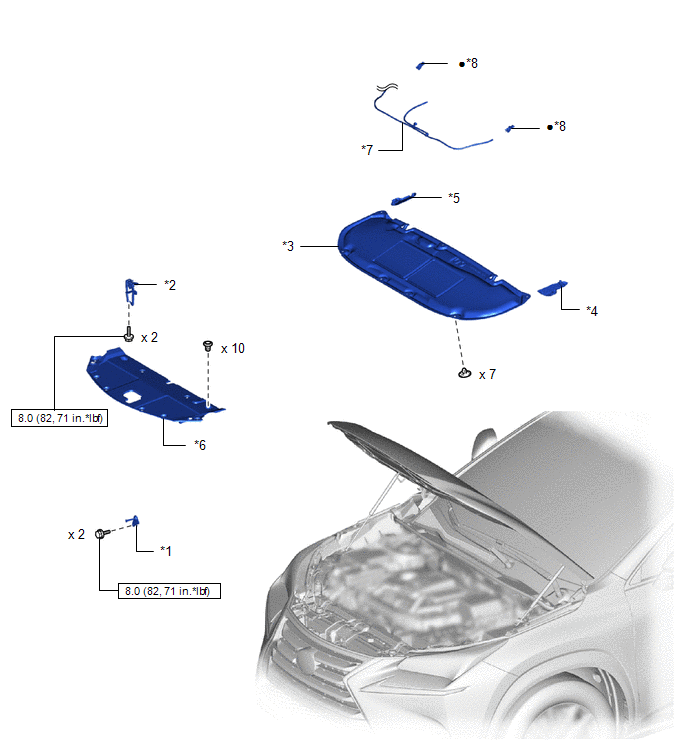
| *1 | ENGINE HOOD LOCK STRIKER ASSEMBLY | *2 | HOOD AUXILIARY CATCH HOOK ASSEMBLY |
| *3 | HOOD INSULATOR | *4 | HOOD TO FRONT FENDER SEAL LH |
| *5 | HOOD TO FRONT FENDER SEAL RH | *6 | RADIATOR SUPPORT OPENING COVER |
| *7 | WASHER HOSE ASSEMBLY | *8 | WASHER NOZZLE SUB-ASSEMBLY |
.png) | N*m (kgf*cm, ft.*lbf): Specified torque | ● | Non-reusable part |
READ NEXT:
 On-vehicle Inspection
ON-VEHICLE INSPECTION PROCEDURE 1. INSPECT HOOD SUB-ASSEMBLY (a) Check that the clearance measurements of areas A to E are within the standard ranges. Standard Clearance: Area Specified Conditi
Disassembly
DISASSEMBLY PROCEDURE 1. REMOVE HOOD INSULATOR (a) Using a clip remover, remove the 7 clips. (b) Detach the 2 guides and remove the hood insulator. 2. REMOVE HOOD TO FRONT FENDER SEAL L
Adjustment
ADJUSTMENT CAUTION / NOTICE / HINT HINT:
Centering bolts are used to mount the hood hinge to the vehicle body and hood. The hood cannot be adjusted with the centering bolts on. Substitute the cente
SEE MORE:
Reassembly
REASSEMBLY PROCEDURE 1. INSTALL NO. 1 COOLER THERMISTOR Click here 2. INSTALL NO. 1 COOLER EVAPORATOR SUB-ASSEMBLY (a) Sufficiently apply compressor oil to 2 new O-rings and the fitting surface of the cooler expansion valve. Compressor Oil: ND-OIL 11 or equivalent (b) Install the 2 O-rings to a n
Steering Heater Switch
InspectionINSPECTION PROCEDURE 1. REMOVE NO. 2 COMBINATION SWITCH ASSEMBLY Click here 2. INSPECT NO. 2 COMBINATION SWITCH ASSEMBLY (a) Measure the voltage according to the value (s) in the table below. Standard Voltage: Tester Connection (Positive (+) Tester Probe - Negative (-) Tester Pro
© 2016-2024 Copyright www.lexunx.com
