Lexus NX: Inspection
Lexus NX Service Manual / Drivetrain / Drive Shaft / Propeller Shaft / Rear Drive Shaft Assembly / Inspection
INSPECTION
CAUTION / NOTICE / HINT
NOTICE:
- When using a vise, place aluminum plates between the part and vise.
- When using a vise, do not overtighten it.
PROCEDURE
1. INSPECT REAR DRIVE SHAFT ASSEMBLY
| (a) Check that there is no excessive play in the radial direction of the inboard joint and outboard joint. |
|
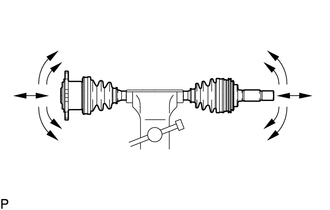
(b) Check the inboard joint boot and outboard joint boot for damage.
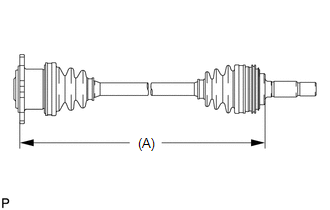
| (c) Check that the inboard joint boot and outboard joint boot are not stretched or contracted when the rear drive shaft assembly is at the standard length. Length (A): 598.1 to 608.1 cm (1.96 to 1.99 ft.) NOTICE: Keep the rear drive shaft assembly level during inspection. If the inboard joint boot and outboard joint boot are stretched or contracted, correct them. |
|
READ NEXT:
 Reassembly
REASSEMBLY CAUTION / NOTICE / HINT NOTICE:
When using a vise, place aluminum plates between the part and vise.
When using a vise, do not overtighten it.
HINT:
Use the same procedure for the
Installation
INSTALLATION CAUTION / NOTICE / HINT HINT:
Use the same procedure for the RH and LH sides.
The procedure listed below is for the LH side.
PROCEDURE 1. INSTALL REAR DRIVE SHAFT ASSEMBLY LH (
SEE MORE:
Data List / Active Test
DATA LIST / ACTIVE TEST DATA LIST NOTICE: In the table below, the values listed under "Normal Condition" are reference values. Do not depend solely on these reference values when deciding whether a part is faulty or not. HINT: Using the Techstream to read the Data List allows the values or states of
Dtc Check / Clear
DTC CHECK / CLEAR CHECK DTC (a) Connect the Techstream to the DLC3. (b) Turn the power switch on (IG). (c) Turn the Techstream on. (d) Enter the following menus: Body Electrical / Main Body / Trouble Codes. Body Electrical > Main Body > Trouble Codes (e) Check for DTCs. CLEAR DTC (a) Connect t
© 2016-2024 Copyright www.lexunx.com
