Lexus NX: Installation
INSTALLATION
PROCEDURE
1. INSTALL NAVIGATION ANTENNA ASSEMBLY
2. INSTALL NAVIGATION ANTENNA BRACKET
| (a) Attach the 4 guides to install the navigation antenna assembly as shown in the illustration. |
|
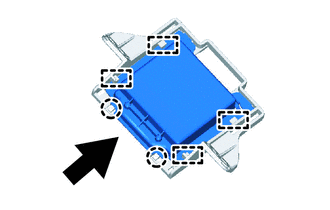
(b) Attach the 2 claws to install the navigation antenna assembly.
3. INSTALL ANTENNA CORD SUB-ASSEMBLY
(a) Connect the connector.
(b) Attach the 4 claws to install the antenna cord sub-assembly.
4. INSTALL NAVIGATION ANTENNA ASSEMBLY WITH BRACKET
(a) Install the navigation antenna assembly with bracket with the 2 screws.
(b) Attach the 2 clamps.
5. INSTALL NO. 1 HEATER TO REGISTER DUCT SUB-ASSEMBLY
Click here .gif)
6. INSTALL UPPER INSTRUMENT PANEL SUB-ASSEMBLY
Click here
READ NEXT:
 Navigation Ecu
ComponentsCOMPONENTS ILLUSTRATION *1 NAVIGATION ECU *2 NO. 1 RADIO BRACKET *3 NO. 2 RADIO BRACKET *4 RADIO RECEIVER ASSEMBLY WITH BRACKET *5 NAVIGATION WIRE - - Remo
Precaution
PRECAUTION PRECAUTION FOR DISCONNECTING CABLE FROM NEGATIVE AUXILIARY BATTERY TERMINAL NOTICE: After the power switch is turned off, the radio receiver assembly records various types of memory and set
SEE MORE:
Vehicle Control History
VEHICLE CONTROL HISTORY CHECK THE VEHICLE CONTROL HISTORY (LIGHTING SYSTEM) HINT:
The vehicle control history data (lighting system) stores the history of the reject function and system protection operations.
The number of occurrences, date and distance are stored in batches for each item.
(
Diagnosis System
DIAGNOSIS SYSTEM DESCRIPTION When troubleshooting a vehicle with a diagnosis system, the only difference from the usual troubleshooting procedure is connecting the Techstream to the vehicle and reading various data output from the skid control ECU (brake booster with master cylinder assembly). The s
© 2016-2024 Copyright www.lexunx.com
