Lexus NX: On-vehicle Inspection
ON-VEHICLE INSPECTION
PROCEDURE
1. INSPECT HOOD SUB-ASSEMBLY
(a) Check that the clearance measurements of areas A to E are within the standard ranges.
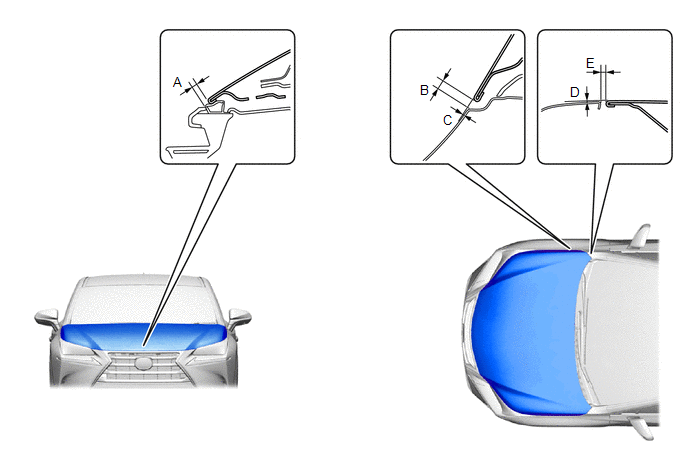
Standard Clearance:
| Area | Specified Condition | Area | Specified Condition |
|---|---|---|---|
| A | 2.45 to 6.45 mm (0.0965 to 0.2539 in.) | B | 3.7 to 6.7 mm (0.1457 to 0.2638 in.) |
| C | -0.8 to 2.2 mm (-0.0315 to 0.0866 in.) | D | -1.2 to 1.8 mm (-0.0472 to 0.0709 in.) |
| E | 3.0 to 6.0 mm (0.1181 to 0.2362 in.) | - | - |
READ NEXT:
 Disassembly
DISASSEMBLY PROCEDURE 1. REMOVE HOOD INSULATOR (a) Using a clip remover, remove the 7 clips. (b) Detach the 2 guides and remove the hood insulator. 2. REMOVE HOOD TO FRONT FENDER SEAL L
Adjustment
ADJUSTMENT CAUTION / NOTICE / HINT HINT:
Centering bolts are used to mount the hood hinge to the vehicle body and hood. The hood cannot be adjusted with the centering bolts on. Substitute the cente
Reassembly
REASSEMBLY PROCEDURE 1. INSTALL ENGINE HOOD LOCK STRIKER ASSEMBLY (a) Attach the guide. (b) Install the engine hood lock striker assembly with the 2 bolts. Torque: 8.0 N·m {82 kgf·cm, 71 in·lbf} 2
SEE MORE:
System Description
SYSTEM DESCRIPTION ADAPTIVE VARIABLE SUSPENSION SYSTEM DESCRIPTION (a) The absorber control ECU receives signals from the sensors and switches to control the absorber control actuator (shock absorber assembly). It uses these signals to optimally control the damping force in accordance with the drivi
Diagnosis System
DIAGNOSIS SYSTEM DESCRIPTION (a) Smart access system with push-button start (for Start Function) data and Diagnostic Trouble Codes (DTCs) can be read through the Data Link Connector 3 (DLC3) of the vehicle. When the system seems to be malfunctioning, use the Techstream to check for malfunctions and
© 2016-2024 Copyright www.lexunx.com
