Lexus NX: Removal
REMOVAL
PROCEDURE
1. REMOVE NO. 1 ENGINE UNDER COVER ASSEMBLY
Click here .gif)
2. REMOVE FAN AND GENERATOR V BELT
Click here
3. REMOVE FRONT SUSPENSION MEMBER REINFORCEMENT RH
Click here
4. REMOVE CRANKSHAFT PULLEY ASSEMBLY
Click here
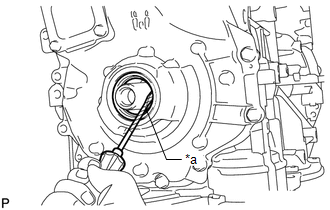
5. REMOVE TIMING CHAIN COVER OIL SEAL
| (a) Using a screwdriver, pry out the timing chain cover oil seal. NOTICE: Do not damage the surface of the timing chain cover oil seal press fit hole or the crankshaft. HINT: Tape the screwdriver tip before use. |
|
READ NEXT:
 Installation
INSTALLATION PROCEDURE 1. INSTALL TIMING CHAIN COVER OIL SEAL (a) w/o Side Lip: (1) Apply MP grease to the lip of a new timing chain cover oil seal. NOTICE:
Do not allow foreign matter to contact t
Components
COMPONENTS ILLUSTRATION *1 FLYWHEEL SUB-ASSEMBLY *2 REAR ENGINE OIL SEAL *3 TRANSMISSION INPUT DAMPER ASSEMBLY - - N*m (kgf*cm, ft.*lbf): Specified torque ● Non-reusab
SEE MORE:
Terminals Of Ecu
TERMINALS OF ECU *A w/ Manual (SOS) Switch - - Terminal No. (Symbol) Wiring Color Terminal Description Condition Specified Condition
*1: w/ Manual (SOS) Switch
*2: w/o Manual (SOS) Switch #: There is no wire color information I151-1 (GND1) - Body ground W-B - Body g
Removal
REMOVAL PROCEDURE 1. REMOVE NO. 1 SPEAKER OPENING COVER ASSEMBLY Click here 2. REMOVE AUTOMATIC LIGHT CONTROL SENSOR (a) Detach the 2 claws and remove the automatic light control sensor.
© 2016-2024 Copyright www.lexunx.com
