Lexus NX: Removal
REMOVAL
PROCEDURE
1. REMOVE NO. 1 SPEAKER OPENING COVER ASSEMBLY
Click here .gif)
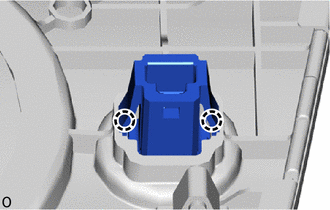
2. REMOVE AUTOMATIC LIGHT CONTROL SENSOR
| (a) Detach the 2 claws and remove the automatic light control sensor. |
|
READ NEXT:
 Inspection
INSPECTION PROCEDURE 1. INSPECT AUTOMATIC LIGHT CONTROL SENSOR (a) Disconnect the automatic light control sensor connector. *a Front view of wire harness connector (to Automatic Ligh
Installation
INSTALLATION PROCEDURE 1. INSTALL AUTOMATIC LIGHT CONTROL SENSOR (a) Attach the 2 claws to install the automatic light control sensor. 2. INSTALL NO. 1 SPEAKER OPENING COVER ASSEMBLY Click here 3.
SEE MORE:
Installation
INSTALLATION PROCEDURE 1. INSTALL VEHICLE SOUND SWITCH (a) Attach the 2 claws to install the vehicle sound switch. 2. INSTALL LOWER NO. 1 INSTRUMENT PANEL FINISH PANEL Click here 3. INSTALL NO. 1 INSTRUMENT PANEL UNDER COVER SUB-ASSEMBLY Click here 4. INSTALL NO. 1 SWITCH HOLE BASE Click her
Components
COMPONENTS ILLUSTRATION *1 FRONT AXLE HUB BOLT LH *2 FRONT DISC *3 FRONT DISC BRAKE CALIPER ASSEMBLY LH - - N*m (kgf*cm, ft.*lbf): Specified torque ● Non-reusable part
© 2016-2024 Copyright www.lexunx.com
