Lexus NX: Removal
REMOVAL
PROCEDURE
1. REMOVE BACK DOOR CENTER GARNISH
Click here .gif)
2. REMOVE BACK DOOR SIDE GARNISH LH
Click here
3. REMOVE BACK DOOR SIDE GARNISH RH
Click here
4. REMOVE BACK DOOR TRIM BASE (w/ Power Back Door)
Click here
5. REMOVE PULL HANDLE (w/ Power Back Door)
Click here
6. REMOVE BACK DOOR FINISH COVER LH (w/o Power Back Door)
Click here
7. REMOVE BACK DOOR FINISH COVER RH (w/o Power Back Door)
Click here
8. REMOVE BACK DOOR LOCK COVER (w/ Power Back Door)
Click here
9. REMOVE BACK DOOR LOCK COVER (w/o Power Back Door)
Click here
10. REMOVE BACK DOOR TRIM BOARD ASSEMBLY
Click here
11. REMOVE BACK DOOR OUTSIDE GARNISH SUB-ASSEMBLY
| (a) Remove the 4 bolts. |
|
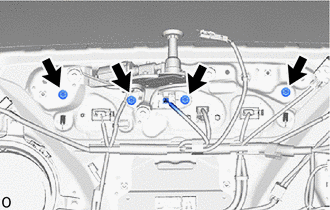
(b) Detach the 12 clips and remove the back door outside garnish sub-assembly.
READ NEXT:
 Disassembly
DISASSEMBLY PROCEDURE 1. REMOVE BACK DOOR UPPER OUTSIDE GARNISH LH (a) Remove the screw and back door upper outside garnish LH. 2. REMOVE BACK DOOR UPPER OUTSIDE GARNISH RH HINT: Use th
Reassembly
REASSEMBLY PROCEDURE 1. INSTALL NUT (a) Install the 2 nuts. 2. INSTALL SYMBOL EMBLEM Click here 3. INSTALL BACK DOOR OUTSIDE GARNISH PROTECTOR (a) Clean the back door outside garnish surface. (1)
Installation
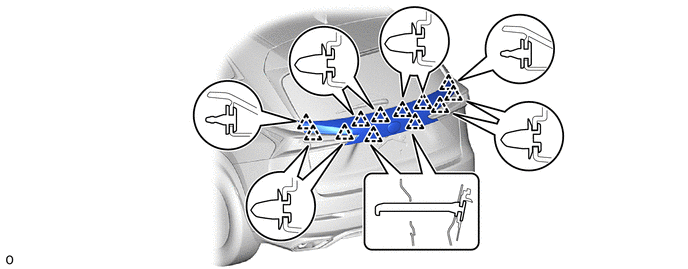
INSTALLATION PROCEDURE 1. INSTALL BACK DOOR OUTSIDE GARNISH SUB-ASSEMBLY (a) Attach the 12 clips to install the back door outside garnish sub-assembly. (b) Install the 4 bolts. Torque: 5.0 N·m {
SEE MORE:
Removal
REMOVAL PROCEDURE 1. REMOVE FRONT DOOR TRIM COVER LH Click here 2. REMOVE FRONT DOOR INSIDE HANDLE BEZEL PLUG LH Click here 3. REMOVE POWER WINDOW REGULATOR MASTER SWITCH ASSEMBLY WITH FRONT DOOR ARMREST BASE PANEL Click here 4. REMOVE FRONT DOOR TRIM BOARD SUB-ASSEMBLY LH Click here 5.
Installation
INSTALLATION PROCEDURE 1. INSTALL TRIP SWITCH (LIGHT CONTROL RHEOSTAT) (a) Attach the 2 claws to install the trip switch (light control rheostat). 2. INSTALL NO. 1 INSTRUMENT PANEL SAFETY PAD SUB-ASSEMBLY Click here 3. INSTALL INSTRUMENT SIDE PANEL LH Click here
© 2016-2024 Copyright www.lexunx.com
