Lexus NX: Removal
REMOVAL
CAUTION / NOTICE / HINT
HINT:
- Use the same procedure for the RH and LH sides.
- The procedure described below is for the LH side.
PROCEDURE
1. REMOVE FRONT BUMPER ASSEMBLY
(a) except Sport Package:
Click here .gif)
(b) for Sport Package:
Click here
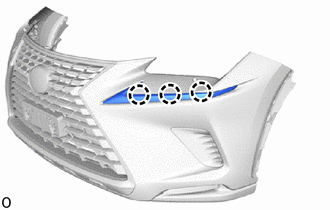
2. REMOVE CLEARANCE LIGHT ASSEMBLY LH
(a) w/ Headlight Cleaner System:
| (1) Detach the claw and disconnect the headlight cleaner hose. |
|
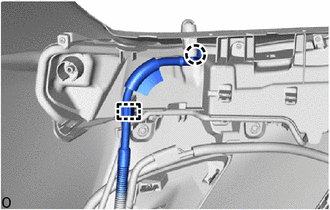
(2) Detach the hose clamp.
| (b) Detach the 2 wire harness clamps. |
|
.png)
(c) Remove the clip and 3 screws.
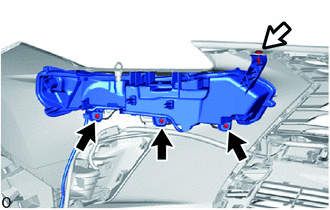
.png) | Screw |
.png) | Clip |
| (d) Detach the 3 claws and remove the clearance light assembly LH. |
|
READ NEXT:
 Inspection
INSPECTION PROCEDURE 1. INSPECT CLEARANCE LIGHT ASSEMBLY LH (a) Apply battery voltage to the connector and check the light illumination condition. OK: Battery Connection Specified Condition
Installation
INSTALLATION CAUTION / NOTICE / HINT HINT:
Use the same procedure for the RH and LH sides.
The procedure described below is for the LH side.
PROCEDURE 1. INSTALL CLEARANCE LIGHT ASSEMBLY LH (a
SEE MORE:
Dtc Check / Clear
DTC CHECK / CLEAR CHECK DTC (a) Check main body ECU (multiplex network body ECU) (1) Connect the Techstream to the DLC3. (2) Turn the power switch on (IG). (3) Turn the Techstream on. (4) Enter the following menus: Body Electrical / Main Body / Trouble Codes. (5) Check for DTCs. Body Electrical >
Removal
REMOVAL PROCEDURE 1. REMOVE FRONT SUSPENSION CROSSMEMBER SUB-ASSEMBLY Click here 2. REMOVE FRONT STABILIZER LINK ASSEMBLY LH (a) Remove the nut and front stabilizer link assembly LH. HINT: If the ball joint turns together with the nut, use a 6 mm hexagon wrench to hold the stud bolt.
© 2016-2024 Copyright www.lexunx.com
