Lexus NX: Height Control Sensor Malfunction (B2416,B241A)
DESCRIPTION
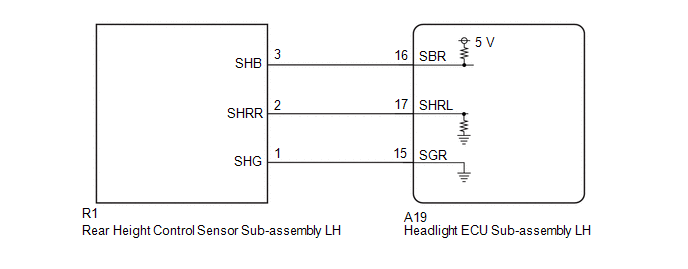
The headlight ECU sub-assembly LH supplies 5 V to the rear height control sensor LH, reads changes in the voltage that occur due to height sensor resistance changes according to the vehicle height, and performs auto leveling control.
| DTC No. | Detection Item | DTC Detection Condition | Trouble Area |
|---|---|---|---|
| B2416 | Height Control Sensor Malfunction |
|
|
| B241A | Rear Height Control Sensor |
|
|
WIRING DIAGRAM
CAUTION / NOTICE / HINT
NOTICE:
-
If the headlight ECU sub-assembly LH has been replaced, it is necessary to synchronize the vehicle information and initialize the headlight ECU sub-assembly LH.
Click here
.gif)
-
After the rear height control sensor sub-assembly LH is replaced or removed and installed, initialization is necessary.
Click here
-
Before performing the check, check that the rear height control sensor sub-assembly LH is installed properly.
Click here
PROCEDURE
| 1. | CHECK FOR DTC |
(a) Clear the DTCs.
Click here
(b) Turn the power switch on (IG) and wait for at least 10 seconds or more.
(c) Check for DTCs.
Click here
OK:
DTC B2416 and B241A are not output.
| OK | .gif) | USE SIMULATION METHOD TO CHECK |
|
.gif)
| 2. | INSPECT REAR HEIGHT CONTROL SENSOR SUB-ASSEMBLY LH |
(a) Remove the rear height control sensor sub-assembly LH.
Click here
(b) Inspect the rear height control sensor sub-assembly LH.
Click here
| NG | | REPLACE REAR HEIGHT CONTROL SENSOR SUB-ASSEMBLY LH |
|
| 3. | CHECK HARNESS AND CONNECTOR (HEADLIGHT ECU SUB-ASSEMBLY LH - REAR HEIGHT CONTROL SENSOR SUB-ASSEMBLY LH) |
(a) Disconnect the A19 headlight ECU sub-assembly LH connector.
(b) Disconnect the R1 rear height control sensor sub-assembly LH connector.
(c) Measure the resistance according to the value(s) in the table below.
Standard Resistance:
| Tester Connection | Condition | Specified Condition |
|---|---|---|
| A19-16 (SBR) - R1-3 (SHB) | Always | Below 1 Ω |
| A19-17 (SHRL) - R1-2 (SHRR) | Always | Below 1 Ω |
| A19-15 (SGR) - R1-1 (SHG) | Always | Below 1 Ω |
| A19-16 (SBR) or R1-3 (SHB) - Body ground | Always | 10 kΩ or higher |
| A19-17 (SHRL) or R1-2 (SHRR) - Body ground | Always | 10 kΩ or higher |
| A19-15 (SGR) or R1-1 (SHG) - Body ground | Always | 10 kΩ or higher |
| OK | | REPLACE HEADLIGHT ECU SUB-ASSEMBLY LH |
| NG | | REPAIR OR REPLACE HARNESS OR CONNECTOR |
READ NEXT:
 Headlight Beam Level Control Motor LH Malfunction (B2417,B2418)
DESCRIPTION DTC No. Detection Item DTC Detection Condition Trouble Area B2417 Headlight Beam Level Control Motor LH Malfunction
Power switch on (IG)
Malfunction in headlight
Headlight Leveling Motor LH Communication Malfunction (B2424,B2410,B2411,B2425)
DESCRIPTION Each headlight ECU sub-assembly and headlight swivel and leveling motor communicate via LIN communication. The headlight swivel and leveling motor operates according to power supplied and
Initialization has not been Performed (B2450)
DESCRIPTION The vehicle height must be initialized for the headlight ECU sub-assembly LH to perform auto leveling control. DTC No. Detection Item DTC Detection Condition Trouble Area B245
SEE MORE:
Reassembly
REASSEMBLY CAUTION / NOTICE / HINT HINT: Perform "Inspection After Repairs" after replacing the piston or piston ring. Click here PROCEDURE 1. INSTALL STUD BOLT NOTICE: If a stud bolt is deformed or its threads are damaged, replace it. (a) Using an E8 "TORX" socket wrench, install the stud bolt
Removal
REMOVAL CAUTION / NOTICE / HINT HINT:
Use the same procedure for the RH and LH sides.
The procedure listed below is for the LH side.
PROCEDURE 1. PRECAUTION NOTICE: After the power switch off is turned off, there may be a waiting time before disconnecting the auxiliary negative (-) battery t
