Lexus NX: Removal
REMOVAL
PROCEDURE
1. REMOVE CENTER BACK DOOR GARNISH
Click here .gif)
2. REMOVE BACK DOOR SIDE GARNISH LH
Click here
3. REMOVE BACK DOOR SIDE GARNISH RH
Click here
4. REMOVE BACK DOOR FINISH COVER LH (w/o Power Back Door)
Click here
5. REMOVE BACK DOOR FINISH COVER RH (w/o Power Back Door)
Click here
6. REMOVE BACK DOOR TRIM BASE (w/ Power Back Door)
Click here
7. REMOVE PULL HANDLE (w/ Power Back Door)
Click here
8. REMOVE BACK DOOR LOCK COVER (w/o Power Back Door)
Click here
9. REMOVE BACK DOOR LOCK COVER (w/ Power Back Door)
Click here
10. REMOVE BACK DOOR TRIM BOARD ASSEMBLY
Click here
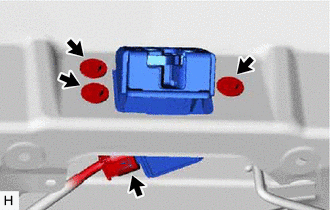
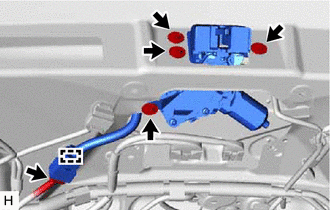
11. REMOVE BACK DOOR LOCK ASSEMBLY (BACK DOOR COURTESY SWITCH)
| (a) w/o Power Back Door: (1) Disconnect the connector. (2) Remove the 3 bolts and back door lock assembly (back door courtesy switch). |
|
| (b) w/ Power Back Door: (1) Disconnect the connector and detach the clamp. (2) Remove the 4 bolts and back door lock assembly (back door courtesy switch). |
|
READ NEXT:
 Inspection
INSPECTION PROCEDURE 1. INSPECT BACK DOOR LOCK ASSEMBLY (BACK DOOR COURTESY SWITCH) (a) w/o Power Back Door: (1) Move the back door lock assembly to the lock position. *1 Latch *
Installation
INSTALLATION PROCEDURE 1. INSTALL BACK DOOR LOCK ASSEMBLY (BACK DOOR COURTESY SWITCH) HINT:
When installing a new back door lock assembly (back door courtesy switch), if there is a rope on the asse
SEE MORE:
Data List / Active Test
DATA LIST / ACTIVE TEST DATA LIST HINT: Using the Techstream to read the Data List allows the values or states of switches, sensors, actuators and other items to be read without removing any parts. This non-intrusive inspection can be very useful because intermittent conditions or signals may be dis
Removal
REMOVAL PROCEDURE 1. REMOVE NO. 1 ENGINE UNDER COVER ASSEMBLY Click here 2. REMOVE FAN AND GENERATOR V BELT Click here 3. REMOVE FRONT SUSPENSION MEMBER REINFORCEMENT RH Click here 4. REMOVE CRANKSHAFT PULLEY ASSEMBLY Click here 5. REMOVE TIMING CHAIN COVER OIL SEAL (a) Using a screwdri
