Lexus NX: Front seats
The seats can be adjusted (longitudinally, vertically, etc.). Adjust the seat to ensure the correct driving posture.
Adjustment procedure
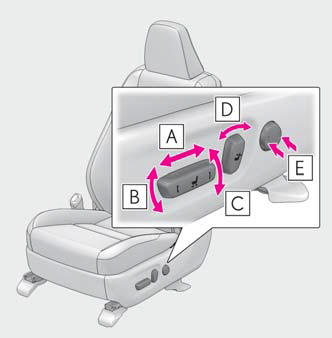
- Seat position adjustment switch
- Seat cushion (front) angle adjustment switch
- Vertical height adjustment switch
- Seatback angle adjustment switch
- Lumbar support adjustment switch (for driver's side)
■Power easy access system (if equipped) The driver's seat and steering wheel move in accordance with power switch mode and the driver's seat belt condition.
WARNING
■When adjusting the seat position
- Take care when adjusting the seat position to ensure that other passengers are not injured by the moving seat.
- Do not put your hands under the seat
or near the moving parts to avoid
injury.
Fingers or hands may become jammed in the seat mechanism.
■Seat adjustment To reduce the risk of sliding under the lap belt during a collision, do not recline the seat more than necessary.
If the seat is too reclined, the lap belt may slide past the hips and apply restraint forces directly to the abdomen, or your neck may contact the shoulder belt, increasing the risk of death or serious injury in the event of an accident.
Adjustments should not be made while driving as the seat may unexpectedly move and cause the driver to lose control of the vehicle.
READ NEXT:
 Rear seats
Reclining adjustments and folding
the seat backs can be done with
either lever or switch operations.
Adjustment procedure
Manual seat
Reclining adjustment
Power seat
Reclining adjus
Driving position memory
This feature automatically adjusts
the front seats, steering wheel and
outside rear view mirrors to make
entering and exiting the vehicle
easier or to suit your preferences.
Three different dri
Head restraints
Head restraints are provided for all
seats.
WARNING
■Head restraint precautions
Observe the following precautions
regarding the head restraints.
Failure to do so may result in death or
seri
SEE MORE:
Head restraints
Head restraints are provided for all
seats.
WARNING
■Head restraint precautions
Observe the following precautions
regarding the head restraints.
Failure to do so may result in death or
serious injury.
Use the head restraints designed for
each respective seat.
Adjust the head restr
Remote Touch Screen Does not Generate Vibration Feedback
DESCRIPTION When each button displayed on the multi-display assembly is selected via remote touch screen operation, the remote touch screen generates vibration feedback according to communication between the remote touch and radio receiver assembly. CAUTION / NOTICE / HINT NOTICE: When replacing the
