Lexus NX: Removal
REMOVAL
PROCEDURE
1. REMOVE MAP LIGHT ASSEMBLY (PERSONAL LIGHT)
| (a) Using moulding remover D, detach the 4 clips. |
|
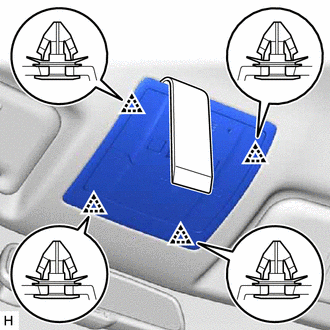
(b) Disconnect the connectors and remove the map light assembly (personal light).
READ NEXT:
 Disassembly
DISASSEMBLY PROCEDURE 1. REMOVE MAP LIGHT SUB-ASSEMBLY (a) Using a screwdriver, detach the 17 claws and remove the map light sub-assembly. HINT: Tape the screwdriver tip before use. *1
Inspection
INSPECTION PROCEDURE 1. INSPECT MAP LIGHT ASSEMBLY (PERSONAL LIGHT) (a) Inspect the front map light. (1) Apply battery voltage to the connector and check the light illumination condition. OK: M
Reassembly
REASSEMBLY PROCEDURE 1. INSTALL MAP LIGHT SUB-ASSEMBLY (a) Attach the 17 claws to install the map light sub-assembly.
SEE MORE:
Switch Lights of Remote Touch Always Illuminate or cannot be Controlled Using Rheostat
DESCRIPTION Power is supplied to the remote touch illumination when the light control switch is in the tail or head position. HINT:
When the remote touch is in self check mode, the switch illumination on the remote touch may remain on.
If any illumination controlled by the rheostat switch has a
Customize Parameters
CUSTOMIZE PARAMETERS CUSTOMIZE SMART ACCESS SYSTEM WITH PUSH-BUTTON START (for Entry Function) HINT: The following items can be customized. NOTICE:
When the customer requests a change in a function, first make sure that the function can be customized.
Record the current settings before customiz
© 2016-2024 Copyright www.lexunx.com
