Lexus NX: Components
COMPONENTS
ILLUSTRATION
.png)
| *1 | DECK FLOOR BOX LH | *2 | NO. 3 DECK BOARD SUB-ASSEMBLY |
| *3 | REAR DECK FLOOR BOX | *4 | NEGATIVE AUXILIARY BATTERY TERMINAL |
.png) | N*m (kgf*cm, ft.*lbf): Specified torque | - | - |
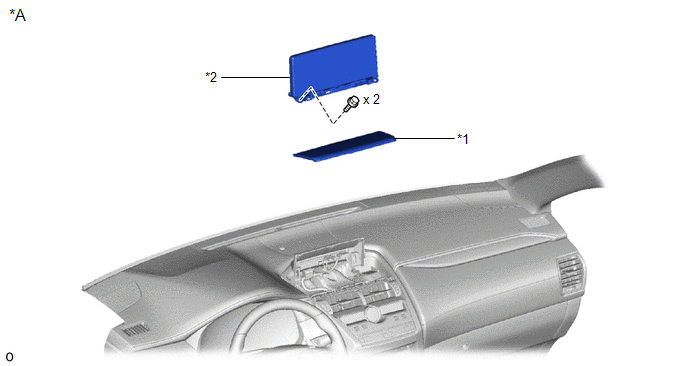
ILLUSTRATION

| *A | for 8 Inch | - | - |
| *1 | INSTRUMENT PANEL FINISH PLATE | *2 | MULTI-DISPLAY ASSEMBLY WITH BRACKET |
ILLUSTRATION
| *A | for 10.3 Inch | - | - |
| *1 | INSTRUMENT PANEL FINISH PLATE | *2 | MULTI-DISPLAY ASSEMBLY WITH BRACKET |
ILLUSTRATION
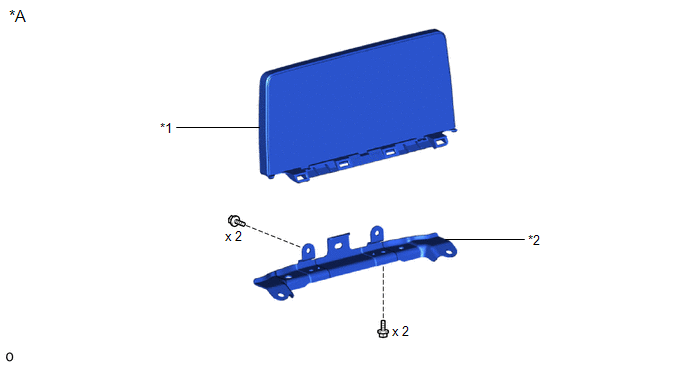
| *A | for 8 Inch | - | - |
| *1 | MULTI-DISPLAY ASSEMBLY | *2 | MULTI-DISPLAY CONTROLLER BRACKET A |
ILLUSTRATION
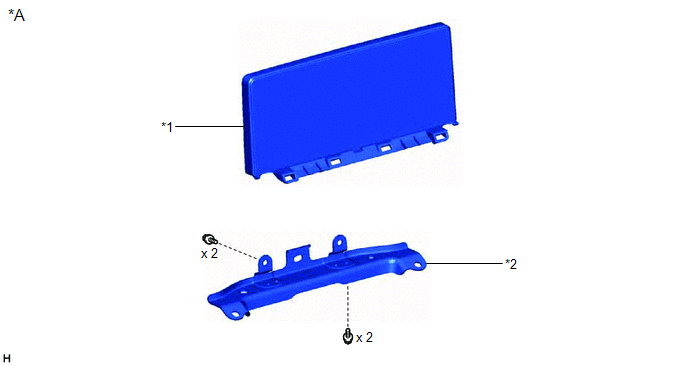
| *A | for 10.3 Inch | - | - |
| *1 | INSTRUMENT PANEL FINISH PLATE | *2 | MULTI-DISPLAY ASSEMBLY WITH BRACKET |
READ NEXT:
 Removal
REMOVAL PROCEDURE 1. REMOVE DECK BOARD ASSEMBLY Click here 2. REMOVE NO. 3 DECK BOARD SUB-ASSEMBLY Click here 3. REMOVE REAR DECK FLOOR BOX Click here 4. REMOVE DECK FLOOR BOX LH Click here 5.
Installation
INSTALLATION PROCEDURE 1. INSTALL MULTI-DISPLAY ASSEMBLY 2. INSTALL MULTI-DISPLAY CONTROLLER BRACKET A (a) for 8 inch: (1) Temporarily install the multi-display controller bracket A with the 2 scre
SEE MORE:
Adjustment
ADJUSTMENT PROCEDURE 1. REMOVE NO. 1 ENGINE UNDER COVER ASSEMBLY Click here 2. DRAIN HYBRID TRANSAXLE FLUID (a) Using a 10 mm hexagon socket wrench, remove the filler plug and gasket from the hybrid vehicle transaxle assembly. *1 Filler Plug *2 Drain Plug (b) Using
Precaution
PRECAUTION CAUTION:
While the auxiliary battery is connected, even if the power switch is off, the brake control system activates when the brake pedal is depressed or the door courtesy switch is turned on. Therefore, during servicing of the brake system components, do not depress the brake pedal
© 2016-2026 Copyright www.lexunx.com
