Lexus NX: Front Passenger Side Power Window Switch
Components
COMPONENTS
ILLUSTRATION
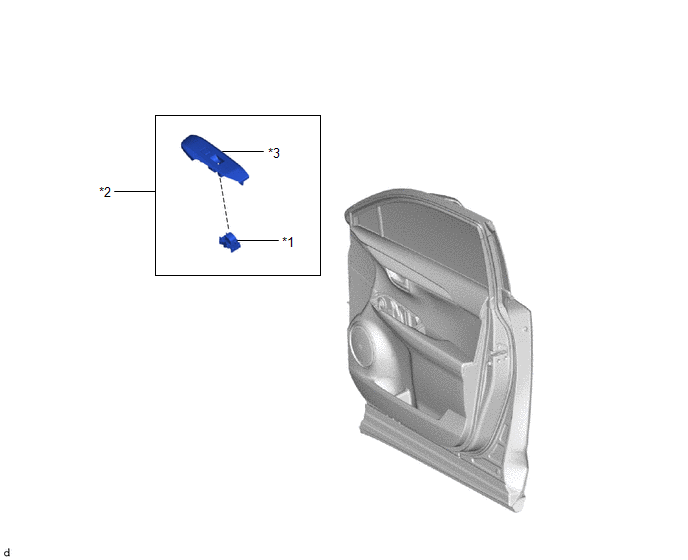
| *1 | POWER WINDOW REGULATOR SWITCH ASSEMBLY | *2 | POWER WINDOW REGULATOR SWITCH ASSEMBLY WITH FRONT DOOR ARMREST BASE PANEL |
| *3 | FRONT DOOR ARMREST BASE PANEL | - | - |
Removal
REMOVAL
PROCEDURE
1. REMOVE POWER WINDOW REGULATOR SWITCH ASSEMBLY WITH FRONT DOOR ARMREST BASE PANEL
Click here .gif)
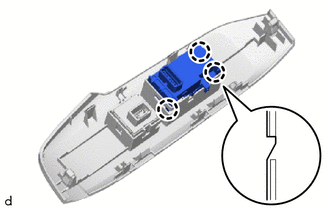
2. REMOVE POWER WINDOW REGULATOR SWITCH ASSEMBLY
| (a) Detach the 3 claws and remove the power window regulator switch assembly. |
|
Inspection
INSPECTION
PROCEDURE
1. INSPECT POWER WINDOW REGULATOR SWITCH ASSEMBLY
(a) Check the switch function.
| (1) Measure the resistance when the switch is operated according to the value(s) in the table below. Standard Resistance:
If the result is not as specified, replace the power window regulator switch assembly. |
|
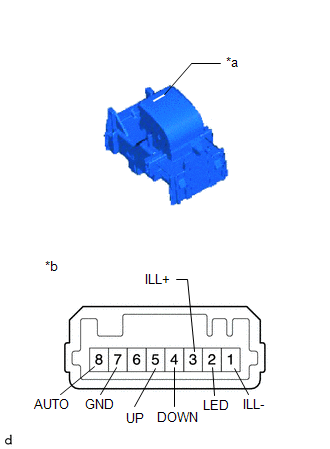
(b) Check that the LED illuminates.
(1) Apply auxiliary battery voltage to the power window regulator switch assembly and check that the LED illuminates.
OK:
| Measurement Condition | Specified Condition |
|---|---|
| Auxiliary battery positive (+) → 3 (ILL+) Auxiliary battery negative (-) → 1 (ILL-) | LED illuminates |
If the result is not as specified, replace the power window regulator switch assembly.
Installation
INSTALLATION
PROCEDURE
1. INSTALL POWER WINDOW REGULATOR SWITCH ASSEMBLY
(a) Attach the 3 claws to install the power window regulator switch assembly.
2. INSTALL POWER WINDOW REGULATOR SWITCH ASSEMBLY WITH FRONT DOOR ARMREST BASE PANEL
Click here .gif)
READ NEXT:
 Precaution
PRECAUTION POWER WINDOW CONTROL SYSTEM PRECAUTIONS NOTICE:
The power window control system uses the LIN communication system and CAN communication system. Inspect the communication function by foll
Parts Location
PARTS LOCATION ILLUSTRATION *1 FRONT DOOR COURTESY LIGHT SWITCH ASSEMBLY LH *2 FRONT DOOR COURTESY LIGHT SWITCH ASSEMBLY RH *3 FRONT DOOR LOCK ASSEMBLY LH *4 POWER WINDOW REGULATOR
SEE MORE:
Components
COMPONENTS ILLUSTRATION *1 DECK FLOOR BOX LH *2 NO. 3 DECK BOARD SUB-ASSEMBLY *3 REAR DECK FLOOR BOX *4 NEGATIVE AUXILIARY BATTERY TERMINAL N*m (kgf*cm, ft.*lbf): Specified torque - - ILLUSTRATION *1 BRAKE PEDAL PAD *2 BRAKE PEDAL RETURN SPRING *3 BR
Inspection
INSPECTION PROCEDURE 1. INSPECT ELECTRICAL KEY TRANSMITTER SUB-ASSEMBLY NOTICE: When replacing the transmitter battery, before starting work, remove static electricity that has built up in the body by touching, for example, the vehicle to prevent the electrical key transmitter sub-assembly from bein
