
Lexus NX: Inspection
INSPECTION
PROCEDURE
1. INSPECT SHIFT PADDLE SWITCH (TRANSMISSION SHIFT SWITCH ASSEMBLY)
| (a) Measure the resistance according to the value(s) in the table below. Standard Resistance: Shift Paddle Switch RH (Transmission Shift Switch Assembly):
If the resistance values are not as specified, replace the shift paddle switch LH (transmission shift switch assembly). |
|
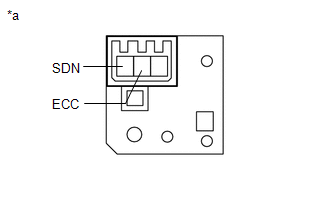
| (b) Measure the resistance according to the value(s) in the table below. Standard Resistance: Shift Paddle Switch RH (Transmission Shift Switch Assembly):
If the resistance values are not as specified, replace the shift paddle switch RH (transmission shift switch assembly). |
|
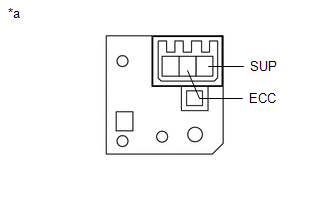
2. INSPECT NO. 1 SWITCH WIRE
(a) Disconnect the No. 1 switch wire connector from the steering pad switch assembly.
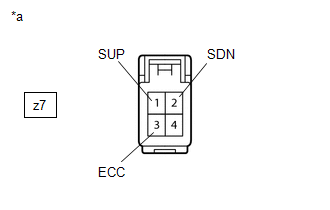
| (b) Measure the resistance according to the value(s) in the table below. Standard Resistance:
If the resistance value is not as specified, replace the No. 1 switch wire. |
|
READ NEXT:
 Installation
INSTALLATION CAUTION / NOTICE / HINT NOTICE:
Do not replace the spiral cable with the battery connected and the power switch on (IG).
Do not rotate the spiral cable when the following conditions
Components
COMPONENTS ILLUSTRATION *1 NO. 1 ENGINE UNDER COVER ASSEMBLY - - ILLUSTRATION *1 INVERTER BRACKET ASSEMBLY *2 INVERTER WATER PUMP WITH MOTOR ASSEMBLY *3 TRANSMISSION CONTR
SEE MORE:
Disassembly
DISASSEMBLY PROCEDURE 1. REMOVE HEADLIGHT WASHER ACTUATOR SUB-ASSEMBLY RH (w/ Headlight Cleaner System) Click here 2. REMOVE HEADLIGHT WASHER ACTUATOR SUB-ASSEMBLY LH (w/ Headlight Cleaner System) HINT: Use the same procedure described for the RH side. 3. REMOVE HEADLIGHT CLEANER WASHER NOZZLE COV
Disassembly
DISASSEMBLY PROCEDURE 1. PRECAUTION NOTICE:
Be sure to read Precaution thoroughly before servicing.
Click here
Do not reuse parts which have reduced fastening ability due to thread damage.
When installing components, make sure that the wire harness is not pinched or pulled.
Do not use sol
