Lexus NX: Satellite Radio Broadcast cannot be Received
WIRING DIAGRAM
.png)
CAUTION / NOTICE / HINT
NOTICE:
- Some satellite radio broadcasts require payment. A contract must be made between a satellite radio company and the user. If the contract expires, it will not be possible to listen to the broadcast.
-
When replacing the radio receiver assembly, always replace it with a new one.
If a radio receiver assembly which was installed to another vehicle is used, the following may occur:
- A communication malfunction DTC may be stored.
- The radio receiver assembly may not operate normally.
HINT:
Depending on the parts that are replaced during vehicle inspection or maintenance, performing initialization, registration or calibration may be needed. Refer to Precaution for Audio and Visual System.
Click here .gif)
PROCEDURE
| 1. | CHECK SURROUNDINGS |
(a) Check if the vehicle is in an environment where reception is difficult due to something blocking the area above the vehicle.
HINT:
If the area above the vehicle is blocked, such as when in a building or tunnel, reception may not be possible.
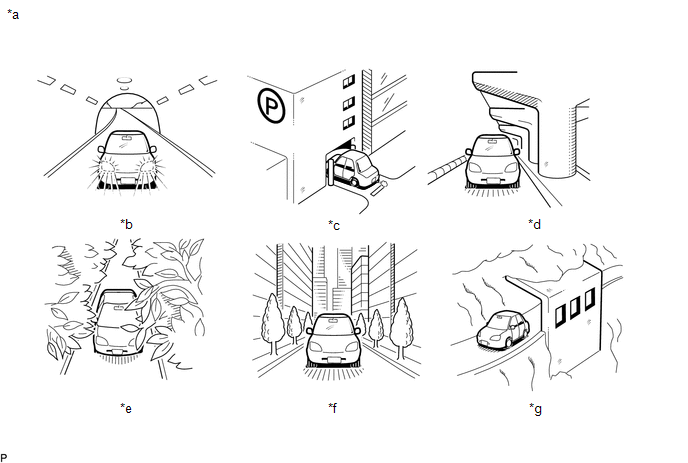
| *a | Example | *b | In a tunnel |
| *c | In a building | *d | Under an overpass |
| *e | On a forest or tree-lined path | *f | Between tall buildings |
| *g | Under a cliff or overhang | - | - |
OK:
Area above vehicle is not blocked.
| NG | .gif) | END (MOVE VEHICLE TO LOCATION WHERE RECEPTION IS BETTER) |
|
.gif)
| 2. | CHECK RADIO RECEIVER ASSEMBLY |
(a) Check if CH001 (free broadcast) can be received.
OK:
CH001 can be received.
| NG | | GO TO STEP 6 |
|
| 3. | CHECK DISPLAY SETTING |
(a) Check the display screen.
| Result | Proceed to |
|---|---|
| "UNAUTH" is displayed | A |
| "-----" is displayed | B |
| None of the displays above are shown | C |
| B | | THERE IS NO SONG/PROGRAM TITLE OR ARTIST NAME/FEATURE ASSOCIATED WITH CHANNEL AT THAT TIME |
| C | | GO TO STEP 6 |
|
| 4. | CHECK CONTRACT CONDITIONS |
(a) Check if the pay-type contract has been extended, or if the contract period has ended.
OK:
Pay-type contract is valid.
| NG | | TO RECEIVE PAY-TYPE BROADCASTS, CONTRACT MUST BE MADE WITH SATELLITE RADIO TUNER COMPANY |
|
| 5. | PERFORM ACTIVATION REFRESH |
(a) Perform activation refresh by referring to the satellite radio service website (http://www.siriusxm.com).
HINT:
The Sirius XM radio ID that is necessary to perform activation refresh can be displayed when CH000 is selected on the satellite radio.
OK:
Malfunction disappears.
| OK | | END |
| NG | | PROCEED TO NEXT SUSPECTED AREA SHOWN IN PROBLEM SYMPTOMS TABLE |
| 6. | CHECK DISPLAY |
(a) Check the display screen.
| Result | Proceed to |
|---|---|
| "ANTENNA" is displayed | A |
| "NO SIGNAL" is displayed | B |
| "LOADING" is displayed | |
| "OFF AIR" is displayed | C |
| After "CH UNAVL" is displayed, display automatically switches to CH001 | D |
| None of the displays above are shown | E |
| B | | END (MOVE VEHICLE TO LOCATION WHERE RECEPTION IS BETTER) |
| C | | CHANNEL IS CURRENTLY NOT BEING BROADCAST. BROADCAST CAN BE LISTENED TO OR VIEWED WHEN IT IS BACK ON AIR (CONFIRM WITH RADIO STATION) |
| D | | CHANNEL BROADCAST HAS ENDED (CONFIRM WITH RADIO STATION) |
| E | | GO TO STEP 11 |
|
| 7. | CHECK NO. 4 ANTENNA CORD SUB-ASSEMBLY |
| (a) Disconnect the antenna connector from the roof antenna assembly. |
|
.png)
(b) Disconnect the antenna connector from the No. 2 antenna cord sub-assembly.
(c) Measure the resistance according to the value(s) in the table below.
Standard Resistance:
| Tester Connection | Condition | Specified Condition |
|---|---|---|
| A-3 - B-3 | Always | Below 1 Ω |
| A-3a - B-3a | Always | Below 1 Ω |
| A-3 - Body ground | Always | 10 kΩ or higher |
| A-3a - Body ground | Always | 10 kΩ or higher |
| NG | | REPLACE NO. 4 ANTENNA CORD SUB-ASSEMBLY |
|
| 8. | CHECK NO. 2 ANTENNA CORD SUB-ASSEMBLY |
| (a) Disconnect the antenna connector from the No. 4 antenna cord sub-assembly. |
|
.png)
(b) Disconnect the antenna connector from the No. 1 antenna cord sub-assembly.
(c) Measure the resistance according to the value(s) in the table below.
Standard Resistance:
| Tester Connection | Condition | Specified Condition |
|---|---|---|
| B-3 - C-3 | Always | Below 1 Ω |
| B-3a - C-3a | Always | Below 1 Ω |
| B-3 - Body ground | Always | 10 kΩ or higher |
| B-3a - Body ground | Always | 10 kΩ or higher |
| NG | | REPLACE NO. 2 ANTENNA CORD SUB-ASSEMBLY |
|
| 9. | CHECK NO. 1 ANTENNA CORD SUB-ASSEMBLY |
| (a) Disconnect the antenna connector from the No. 2 antenna cord sub-assembly. |
|
.png)
(b) Disconnect the antenna connector from the radio receiver assembly.
(c) Measure the resistance according to the value(s) in the table below.
Standard Resistance:
| Tester Connection | Condition | Specified Condition |
|---|---|---|
| C-3 - D-1 (SXM) | Always | Below 1 Ω |
| C-3a - D-1a | Always | Below 1 Ω |
| C-3 - Body ground | Always | 10 kΩ or higher |
| C-3a - Body ground | Always | 10 kΩ or higher |
| NG | | REPLACE NO. 1 ANTENNA CORD SUB-ASSEMBLY |
|
| 10. | CHECK ROOF ANTENNA ASSEMBLY |
(a) Replace the roof antenna assembly with a new or known good one and check if the same problem occurs again.
Click here
OK:
Malfunction disappears.
| OK | | END (ROOF ANTENNA ASSEMBLY IS DEFECTIVE) |
| NG | | REPLACE RADIO RECEIVER ASSEMBLY |
| 11. | CONFIRM CURRENTLY SELECTED CHANNEL |
(a) Confirm if CH000 is currently selected.
OK:
CH000 is selected
| OK | | END (CH000 HAS NO SOUND. SELECT ANOTHER CHANNEL) |
| NG | | PROCEED TO NEXT SUSPECTED AREA SHOWN IN PROBLEM SYMPTOMS TABLE |
READ NEXT:
 Satellite Radio Broadcast cannot be Selected or After Selecting Broadcast, Broadcast cannot be Added into Memory
CAUTION / NOTICE / HINT NOTICE:
Some satellite radio broadcasts require payment. A contract must be made between a satellite radio company and the user. If the contract expires, it will not be poss
Noise Occurs
PROCEDURE 1. CHECK NOISE CONDITION (a) Check from which direction the noise comes (front left or right, or rear left or right). OK: The location of the noise source can be determined. NG
No Sound can be Heard from Speakers
PROCEDURE 1. CHECK AUDIO SETTINGS (a) In sound output setting mode, set volume, fader and balance to the initial values and check that the sound is normal. OK: Audio system returns to normal
SEE MORE:
Components
COMPONENTS ILLUSTRATION *1 BLIND SPOT MONITOR BUZZER *2 DECK TRIM SIDE PANEL ASSEMBLY RH *3 LUGGAGE HOLD BELT STRIKER ASSEMBLY *4 NO. 1 LUGGAGE COMPARTMENT TRIM HOOK *5 REAR DOOR OPENING TRIM WEATHERSTRIP RH *6 REAR FLOOR FINISH PLATE *7 ROPE HOOK ASSEMBLY *8
Back Camera Power Supply Failure (C1621)
DESCRIPTION This DTC is stored if the parking assist ECU determines that the input/output signal communication with the rear television camera assembly is abnormal. DTC No. Detection Item DTC Detection Condition Trouble Area C1621 Back Camera Power Supply Failure Rear television cam
