Lexus NX: Back Door Closer does not Operate
DESCRIPTION
When the back door closer does not operate, one of the following may be the cause: 1) improper fit of the back door, or a foreign object is stuck in the back door, 2) a malfunction in the multiplex network door ECU power source circuit, 3) a malfunction in the back door lock assembly circuit, or 4) a malfunction in the multiplex network door ECU.
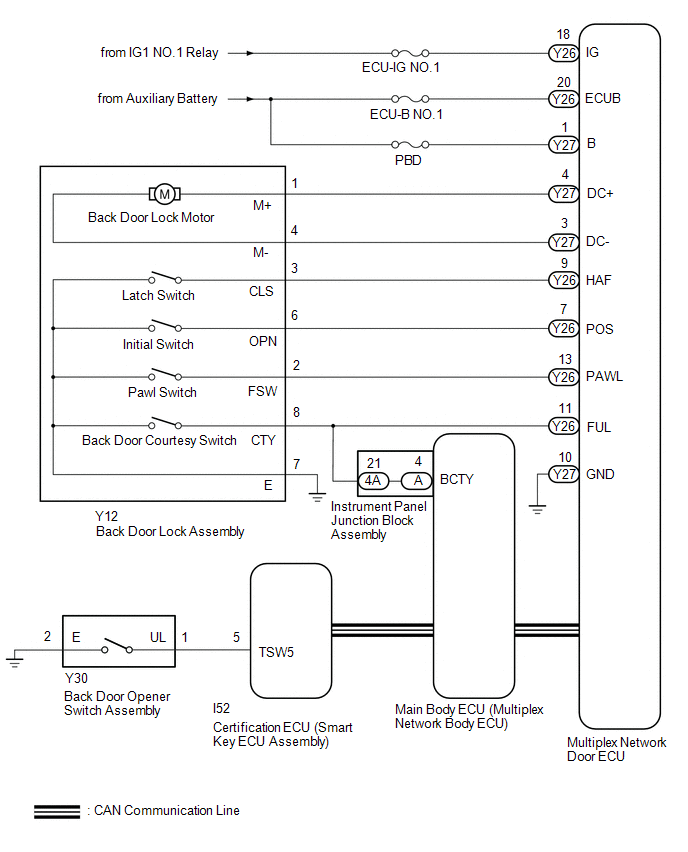
WIRING DIAGRAM
CAUTION / NOTICE / HINT
NOTICE:
-
First perform the communication function inspections in How to Proceed with Troubleshooting to confirm that there are no CAN communication malfunctions before troubleshooting this problem.
Click here
.gif)
- Inspect fuses for circuits related to this system before performing the following inspection procedure.
-
If the replacement, removal and installation of the multiplex network door ECU or disconnection of the connectors of the multiplex network door ECU has been performed, initialize the power back door system.
Click here
- Recognition code registration is necessary when replacing the main body ECU (multiplex network body ECU).
-
If the main body ECU (multiplex network body ECU) is replaced, refer to Registration.
Click here
PROCEDURE
| 1. | CHECK FOR DTC |
(a) Check for DTCs.
Click here
| Result | Proceed to |
|---|---|
| DTC is not output | A |
| DTC B2250 is output | B |
| DTC B2251 is output | C |
| B | .gif) | GO TO DTC B2250 |
| C | | GO TO DTC B2251 |
|
.gif)
| 2. | CHECK BACK DOOR LOCK FUNCTION |
(a) Check if the back door can be fully closed by hand.
| Result | Proceed to |
|---|---|
| The back door can be closed normally | A |
| The back door cannot be closed normally | B |
| B | | IMPROPER FIT OF BACK DOOR, OR A FOREIGN OBJECT IS STUCK IN BACK DOOR |
|
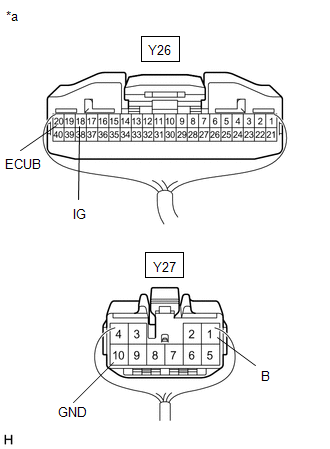
| 3. | CHECK HARNESS AND CONNECTOR (MULTIPLEX NETWORK DOOR ECU -BATTERY AND BODY GROUND) |
| (a) Disconnect the multiplex network door ECU connectors. |
|
(b) Measure the resistance according to the value(s) in the table below.
Standard Resistance:
| Tester Connection | Condition | Specified Condition |
|---|---|---|
| Y27-10 (GND) - Body ground | Always | Below 1 Ω |
(c) Measure the voltage according to the value(s) in the table below.
Standard Voltage:
| Tester Connection | Switch Condition | Specified Condition |
|---|---|---|
| Y26-20 (ECUB) - Body ground | Power switch off | 11 to 14 V |
| Y27-1 (B) - Body ground | Power switch off | 11 to 14 V |
| Y26-18 (IG) - Body ground | Power switch on (IG) | 11 to 14 V |
| Power switch off | Below 1 V |
| NG | | REPAIR OR REPLACE HARNESS OR CONNECTOR |
|
| 4. | INSPECT BACK DOOR LOCK ASSEMBLY |
(a) Remove the back door lock assembly.
Click here
(b) Inspect the back door lock assembly.
Click here
| NG | | REPLACE BACK DOOR LOCK ASSEMBLY |
|
| 5. | CHECK HARNESS AND CONNECTOR (BACK DOOR LOCK ASSEMBLY - MULTIPLEX NETWORK DOOR ECU AND BODY GROUND) |
(a) Disconnect the Y12 back door lock assembly connector.
(b) Disconnect the Y26 and Y27 multiplex network door ECU connectors.
(c) Disconnect the 4A instrument panel junction block assembly connector.
(d) Measure the resistance according to the value(s) in the table below.
Standard Resistance:
| Tester Connection | Condition | Specified Condition |
|---|---|---|
| Y12-1 (M+) - Y27-4 (DC+) | Always | Below 1 Ω |
| Y12-4 (M-) - Y27-3 (DC-) | Always | Below 1 Ω |
| Y12-8 (CTY) - Y26-11 (FUL) | Always | Below 1 Ω |
| Y12-2 (FSW) - Y26-13 (PAWL) | Always | Below 1 Ω |
| Y12-3 (CLS) - Y26-9 (HAF) | Always | Below 1 Ω |
| Y12-6 (OPN) - Y26-7 (POS) | Always | Below 1 Ω |
| Y12-7 (E) - Body ground | Always | Below 1 Ω |
| Y12-1 (M+) or Y27-4 (DC+) - Body ground | Always | 10 kΩ or higher |
| Y12-4 (M-) or Y27-3 (DC-) - Body ground | Always | 10 kΩ or higher |
| Y12-2 (FSW) or Y26-13 (PAWL) - Body ground | Always | 10 kΩ or higher |
| Y12-8 (CTY) or Y26-11 (FUL) - Body ground | Always | 10 kΩ or higher |
| Y12-3 (CLS) or Y26-9 (HAF) - Body ground | Always | 10 kΩ or higher |
| Y12-6 (OPN) or Y26-7 (POS) - Body ground | Always | 10 kΩ or higher |
| OK | | REPLACE MULTIPLEX NETWORK DOOR ECU |
| NG | | REPAIR OR REPLACE HARNESS OR CONNECTOR |
READ NEXT:
 Components
COMPONENTS ILLUSTRATION *A w/ Woofer *B w/o Woofer *C w/o Power Back Door *D w/ Power Back Door *1 BACK DOOR CENTER GARNISH *2 BACK DOOR FINISH COVER LH *3 BACK DOO
Removal
REMOVAL PROCEDURE 1. PRECAUTION Click here 2. REMOVE BACK DOOR CENTER GARNISH Click here 3. REMOVE BACK DOOR SIDE GARNISH LH Click here 4. REMOVE BACK DOOR SIDE GARNISH RH Click here 5. RE
SEE MORE:
Precaution
PRECAUTION PRECAUTIONS DURING REPLACEMENT NOTICE: When replacing electronic parts, if there is a possibility that your body may contact a circuit board, etc., use the recommended tools and observe all precautions to prevent damage to the system by electrostatic discharge (ESD). (a) Procedures where
Switch Operation of Remote Touch not Accepted
CAUTION / NOTICE / HINT NOTICE: When replacing the radio receiver assembly, always replace it with a new one. If a radio receiver assembly which was installed to another vehicle is used, the following may occur:
A communication malfunction DTC may be stored.
The radio receiver assembly may not
