Lexus NX: Components
COMPONENTS
ILLUSTRATION
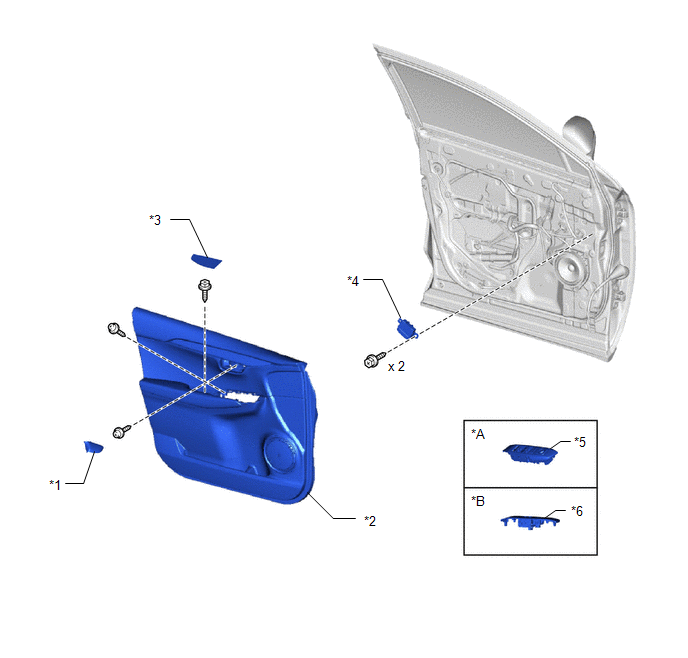
| *A | for Driver Side | *B | for Front Passenger Side |
| *1 | FRONT DOOR INSIDE HANDLE BEZEL PLUG LH | *2 | FRONT DOOR TRIM BOARD SUB-ASSEMBLY LH |
| *3 | FRONT DOOR TRIM COVER LH | *4 | OUTER MIRROR CONTROL ECU ASSEMBLY |
| *5 | POWER WINDOW REGULATOR MASTER SWITCH ASSEMBLY WITH FRONT DOOR ARMREST BASE PANEL | *6 | POWER WINDOW REGULATOR SWITCH ASSEMBLY WITH FRONT DOOR ARMREST BASE PANEL |
READ NEXT:
 Removal
REMOVAL CAUTION / NOTICE / HINT HINT:
Use the same procedure for the RH and LH sides.
The procedure listed below is for the LH side.
PROCEDURE 1. REMOVE FRONT DOOR TRIM COVER LH Click here
Installation
INSTALLATION CAUTION / NOTICE / HINT HINT:
Use the same procedure for the RH and LH sides.
The procedure listed below is for the LH side.
PROCEDURE 1. INSTALL OUTER MIRROR CONTROL ECU ASSEMBLY
SEE MORE:
Freeze Frame Data
FREEZE FRAME DATA FREEZE FRAME DATA (a) Whenever an ASC system DTC is stored, the stereo component equalizer assembly stores the current vehicle state as freeze frame data. CHECK FREEZE FRAME DATA (a) Connect the Techstream to the DLC3. (b) Turn the power switch on (IG). (c) Turn the Techstream on.
Open in Rear Door Electrical Antenna Circuit, Drivers Side (B27A3)
DESCRIPTION The certification ECU (smart key ECU assembly) generates a request signal and transmits the signal to the rear door outside handle assembly (for driver side) (electrical key antenna) at intervals of 0.25 seconds. For the rear door outside handle assembly (for driver side) (electrical key
© 2016-2026 Copyright www.lexunx.com
